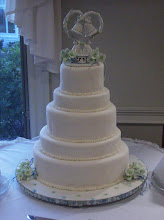
In case you couldn't guess, the cake is finished! There is some left to do to it once I set it up tomorrow, but everything I can do before leaving home is done!
The car is even packed up, and so am I, lol.
I don't have any pictures tonight, because I forgot to take them while finishing up everything I had to do.
I put borders on the two bottom tiers, made the two polar bears, and some other stuff, lol. I'm just too tired to remember it all, but everything is done. The car is all packed up, I just have to put my bags with my clothes and stuff in it tomorrow morning.
I am heading out EARLY (6:15am!!), so hopefully am going to bed fairly early (it's all relative, lol) tonight!
I will have pictures to post tomorrow night after the cake is set up :D
Thursday, April 29, 2010
T-2 days
There was no blog yesterday (duh! You all probably figured that out already, lol). I actually worked on my cake until Midnight (shocking - I know!)! Tonight was only 11:30pm, lol. I guess I'm either getting motivated to do the cake (finally!) or just want a cake to put on the table. It was refreshing to find out yesterday that I am not the only one that is finding it difficult to get motivated to work on my cake.
Be prepared to be amazed at everything I managed to get done yesterday.......... (not sure how many witty comments there's going to be....in all honesty I only remember what I did yesterday because of the pictures,lol).

I made some "Moose Crossing" signs
(hand painted moose by the way!)


Alaska's #1 past time - HOCKEY!!!
And of course, where the eskimos live....ok, that might only be in stories, but they still have them!

If you're wondering what the heck this is......it's and eskimo totem pole. Yes, I made it by hand, and yes, it was quite interesting to do. Apparently from what I've read, eskimo totem poles are meant to tell a story.
 So, I decided this one was going to tell MY story...my cake decorating story if you will. There are three faces on my totem pole....they represent the three phases of cake decorating that I go through with most cakes that I do: Happy, So-So, and Frustrated/Aggravated. There is no particular order to the faces, it's the order I ended up making them in.
I also taped all the little forget-me-not flowers into bunches of five. They may get bunched together again, depending on what I end up using them for on the cake.

Today was airbrushing and painting day!
I started on the bottom tier of the cake by airbrushing the Iditarod Sled Dog Rage trail on the side of the cake.

 I had anticipated this filling most of the cake side - it ended up filling 1/3rd of it. Thanks to this, I airbrushed (or attempted to at least) the silhouette of a sled team - this filled up another 1/3rd of the cake.
What to do....what to do with the 1/3rd of the bottom tier that was BLANK! In my earlier plans, I was going to make a 'Welcome to Anchorage' (where the race begins) and a 'Welcome to Nome' (where it ends) sign, but had nixed it because of time (silly silly me!).


Needless to say, it was the only ideas I could come up with for the remaining empty portion of the cake.
The blue parts are gumpaste, and the rocks are chocolate rocks....the rest is hand painted.
This is where you realize that a little for-thinking is always good. You see.....looking at the bottom tier of the cake, I have the Iditarod Trail going from right to left (geographically correct)....then I have the 'Welcome to Nome' sign, then the 'Welcome to Anchorage' sign, then the sled team. The welcome signs really should be on their respective sides of the trail map, with the team in between. That, however, is a lesson learned for the future (I just hope I remember it then, lol)!
Then I set about working on the middle tier. I attached a lot of what I made yesterday, as well as painting the polar bears white.

I then stacked the cake boards (only 2 of them, the third will get stacked at the show), and attached the bottom and middle tiers to the cake boards. It was then it occured to me, there is a huge GAP between the cake and the board, and between the two cakes. Sooooo, making Royal Icing was added to tomorrow's to-do list, lol.

If you're wondering what the holes in the top of the tier are, they are the holes that the trees and totem pole are going to go into when the cake is assembled on-site at the competition.

 I also attempted to airbrush a night sky, mountains and the Northern Lights on the side of the top tier. I also attempted to paint some trees on the side of the tier.
It went........well, you can just judge for yourself how it worked out, lol
By the time all that was done, it was dinner time. Here's the funny thing about dinner time.....once it's over, I usually have absolutely no motivation to work on cakes. I, however, pushed past it today (it was that or there would be no cake). I took a look at my to-do list, and decided to go ahead and put together the decorative tablecloth for my cake table.
I went to the craft store yesterday and purchased a cornflower blue satin (to match the flowers) and some toule with little crystals on it (hopefully resembling ice??) Let me tell you......cutting two pieces of fabric to the same size and attaching them together is not as easy and one would think!


I did manage to get it done, and it looks fantastic. I hung it on the contraption I made the other day with the PVC pipe from Home Depot.
Be prepared to be amazed at everything I managed to get done yesterday.......... (not sure how many witty comments there's going to be....in all honesty I only remember what I did yesterday because of the pictures,lol).

I made some "Moose Crossing" signs
(hand painted moose by the way!)
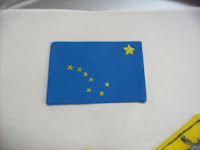
The state flag of Alaska


Alaska's #1 past time - HOCKEY!!!
And of course, where the eskimos live....ok, that might only be in stories, but they still have them!

If you're wondering what the heck this is......it's and eskimo totem pole. Yes, I made it by hand, and yes, it was quite interesting to do. Apparently from what I've read, eskimo totem poles are meant to tell a story.

I also taped all the little forget-me-not flowers into bunches of five. They may get bunched together again, depending on what I end up using them for on the cake.

Today was airbrushing and painting day!
I started on the bottom tier of the cake by airbrushing the Iditarod Sled Dog Rage trail on the side of the cake.

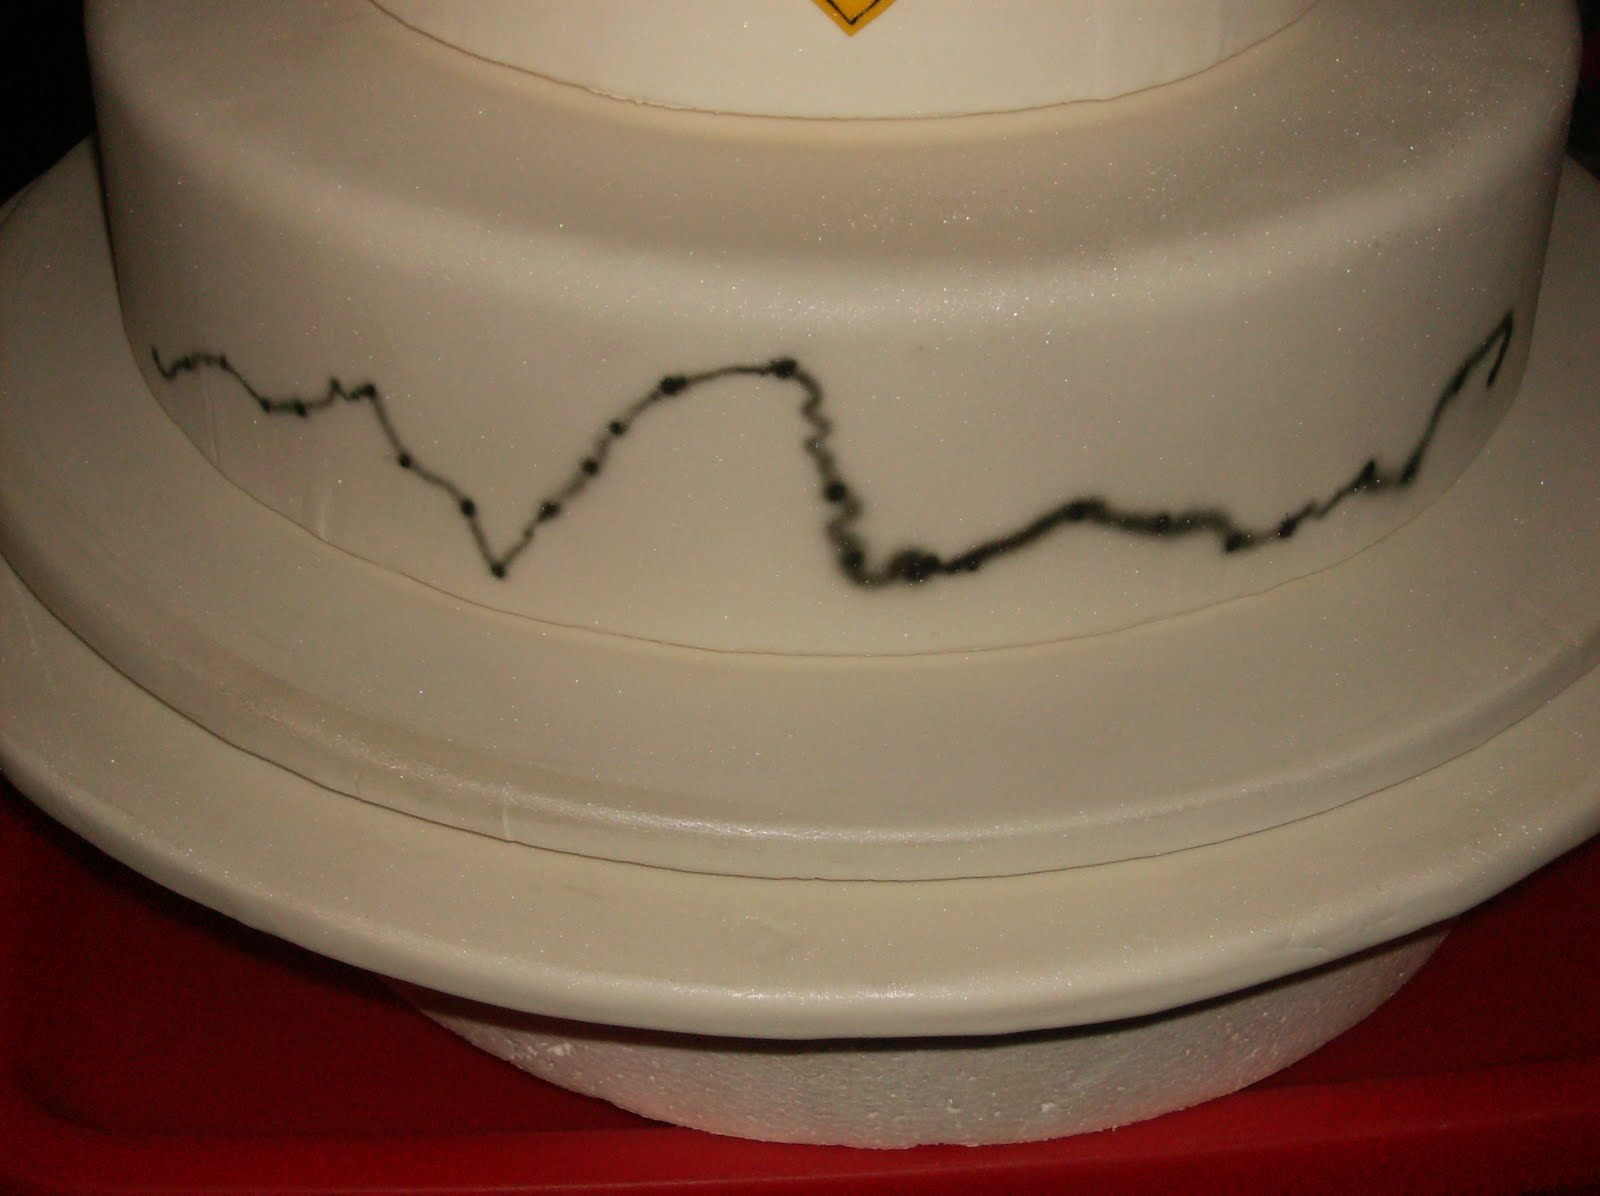 I had anticipated this filling most of the cake side - it ended up filling 1/3rd of it. Thanks to this, I airbrushed (or attempted to at least) the silhouette of a sled team - this filled up another 1/3rd of the cake.
 What to do....what to do with the 1/3rd of the bottom tier that was BLANK! In my earlier plans, I was going to make a 'Welcome to Anchorage' (where the race begins) and a 'Welcome to Nome' (where it ends) sign, but had nixed it because of time (silly silly me!).


Needless to say, it was the only ideas I could come up with for the remaining empty portion of the cake.
The blue parts are gumpaste, and the rocks are chocolate rocks....the rest is hand painted.
This is where you realize that a little for-thinking is always good. You see.....looking at the bottom tier of the cake, I have the Iditarod Trail going from right to left (geographically correct)....then I have the 'Welcome to Nome' sign, then the 'Welcome to Anchorage' sign, then the sled team. The welcome signs really should be on their respective sides of the trail map, with the team in between. That, however, is a lesson learned for the future (I just hope I remember it then, lol)!
Then I set about working on the middle tier. I attached a lot of what I made yesterday, as well as painting the polar bears white.

I then stacked the cake boards (only 2 of them, the third will get stacked at the show), and attached the bottom and middle tiers to the cake boards. It was then it occured to me, there is a huge GAP between the cake and the board, and between the two cakes. Sooooo, making Royal Icing was added to tomorrow's to-do list, lol.

If you're wondering what the holes in the top of the tier are, they are the holes that the trees and totem pole are going to go into when the cake is assembled on-site at the competition.

 I also attempted to airbrush a night sky, mountains and the Northern Lights on the side of the top tier. I also attempted to paint some trees on the side of the tier.
 It went........well, you can just judge for yourself how it worked out, lol
By the time all that was done, it was dinner time. Here's the funny thing about dinner time.....once it's over, I usually have absolutely no motivation to work on cakes. I, however, pushed past it today (it was that or there would be no cake). I took a look at my to-do list, and decided to go ahead and put together the decorative tablecloth for my cake table.
I went to the craft store yesterday and purchased a cornflower blue satin (to match the flowers) and some toule with little crystals on it (hopefully resembling ice??) Let me tell you......cutting two pieces of fabric to the same size and attaching them together is not as easy and one would think!


I did manage to get it done, and it looks fantastic. I hung it on the contraption I made the other day with the PVC pipe from Home Depot.
Monday, April 26, 2010
Trees, Trees, Trees.......................
This cake is slowly but surely coming along..............just not quick enough, lol.
I had some errands to run today for the cake, and by the time I got home I just had no motivation to work in the cake (big surprise, huh?). I had to get rosemary for the trees and ended up going to Home Depot (didn't think it was a cake store, did you????) also (hey, they're almost next door to each other) and got a length of PVC pipe to be able to move fondant into bigger cakes, and also one to transport the table cloth for the competition (to lessen the amount of ironing/steaming that will be necessary once I get there.
I had to buy a 10ft length of PVC pipe, and the helpful people at Home Depot cut it for me. I had them cut it into a 5ft length and two 2.5ft lengths. One of the 2.5ft lengths is for moving the fondant, the 5ft length is for transporting the table cloth, and the leftover 2.5ft length is just that - leftover, lol.

 I also bought a roll of non-skid shelf liner. I cut it to length and covered the 5ft pipe with it, so that the tablecloth will not slide off of it during the drive to MD. I also purchased 10ft of chain and a few clips so that I could hang the 5ft length of pipe along the inside of the car.
I did work on my trees today, after getting back from the store. I got them all finished (yeah!!) and used 1/3rd of the rosemary that I bought at the store, lol. I purchased 9 packages, hoping they would be enough for the three trees. I ended up using one package per tree.
It was interesting putting the rosemary on the trees. I used floral tape to secure the rosemary sprigs onto the branches I had previously made. In retro-spect, it would have been better to cover the branches and THEN attach them to the trees. But, since I did not have enough brown floral tape to take the branches off and re-attach them, I made do with what I had, lol.
I think they turned out pretty fantastic!

Fondant.........Fondahnt......
However you pronounce it (technically I don't think there's a right and wrong, though I have my preference), it can be a royal pain in the *** sometimes!!! When it cooperates, it's absolutely wonderful. When it doesn't, you want to through it across the kitchen (at least I do)!!
Can you guess what I was working on today? That's right.......covering oodles of cake dummies in fondant, along with cake boards.
I decided to start with the largest items first. In this case, it was the cake boards. Since covering cake boards in fondant isn't fun enough, I decided that this particular design requires the fondant to be wrapped over the edge of the cake board, rather than being cut off at the top of board as normal. Let me just say, this sounded like a good idea........in reality, not so much. I managed without getting too upset with the fondant.
I did decide, though, that I really need to go buy a 28" pvc pipe or so from Home Depot for lifting the fondant into these large boards and cakes. The rolling pin I have is 20" long, metal and covered in silicone (love it!). It's absolutely awesome for rolling out fondant, but trying to then pick up that fondant with the rolling pin is kind of tough when the fondant is 26" wide and your rolling pin is 20". I ended up having to lay the cake board (coated in piping gel) upside down onto the fondant, and then flipping the mat, fondant and board over all at once. Yes, it's as scary as it sounds. Yes, I had help. I had to do this with all three cake boards.
Covering the cakes proved to be a little easier. At least I was able to lift the fondant onto the cakes. I covered a total of three cake boards (20", 22" and 24") and three cakes (16", 12" and 11"). I attempted to also cover a 6" cake for a class that I am taking while at the cake show. Notice I said ATTEMPTED......twice, and each time the fondant ripped while putting it on the cake (it was getting kind of dry I think). Usually, cakes for classes come out perfect, lol. So, I kneaded a whole lot of Crisco into the fondant and put it in a zip-lock bag for the night. Hopefully it will be better tomorrow.

 Here are the cake boards and cakes that I did get covered in fondant. There are some flaws in the fondant, but hopefully they'll be hidden when I'm done, lol.
Saturday, April 24, 2010
Naked Trees
That's what I have right now. Three of them actually, lol. They will not be naked for much longer (I hope!). I will be attempting to pipe pine needles onto that branches that I have. Yes, I said pine needles. And yes, I said pipe them on. Yes, I am crazy! :D
So, how did I get trees that actually look like bare trees? Out of a wooden dowel, wires and brown floral tape. Getting the dowel rods cut to the correct length proved interesting (and frustrating!).
I first went to Home Depot thinking they would be able to cut them for me if I bought them there. So, off to Home Depot I went. Once I actually found the wooden dowels (in the moulding section!?!?), I picked out the sizes I wanted and went off in search of the lumber department to get them cut to length. I found a employee (no easy feat btw!) and asked if he could cut the dowels for me, and was informed that they are not allowed to cut dowels for customers. I bought them anyway, since I figured at least I had some, even if I still had to figure out how to get them cut (and sharpened.....but getting them cut was the first priority).
So, off to Lowe's I went. Fortunately they are not too far away from each other. I went into Lowe's, and immediately asked at the Customer Service desk where to find wooden dowels (Hey, I'm not too proud to ask directions!!). Off I went, following the helpful ladies directions and actually found the dowels right away (shocking, isn't it??)! I pulled out the sizes I needed and went in search of an employee. I actually found one without much trouble and asked about getting them cut. He actually said yes!
I should probably mention at this point, that I picked out oak dowels instead of poplar. No idea what my thinking/reasoning really was. My only thought was oak is stronger than poplar. Now, it's not like these dowels have to support a ton of weight - they're only holding up one 11" styrofoam cake dummy.
So, the helpful employee walked over to the saw that Lowe's has. There is a big sign on the saw that says it's broken. At this point, I think, lovely.....not getting the dowels cut, lol. He then proceeds to measure the length I wanted on all 5 dowels and pulls out a hand saw. Now.....even *I* know that cutting an oak dowel with a hand saw is not going to be fun. He doesn't get too far and goes in search of a jigsaw. He finds one, comes back with it and cuts the dowel rods. He hands me all the pieces and I go off to pay for them.
While walking to the register, I look at the dowel rods. Not one of them is the same length. :| So much for accuracy. At that point I somewhat considered buying my own electric saw to cut stuff, but it probably cost too much, lol. So, I head home with my dowel rods, and trying to figure out how to get them sharpened. You see, they are supposed to be pushed down through a 4" cake dummy, and also stick up into another one about 1.5". This won't happen if they are not sharpened first. These are 1/4" and 1/2" dowels we're talking about.
All this was about a week or so ago (I'm not really sure). Today, I decide I'm going to sand the dowels to a point. I have a Dremel tool that I bought years ago.....at least 10yrs ago. It's probably been a few years since I have seen it, lol. I start looking for it, and end up finding it in the way back of my closet, in a box underneath everything else.


I used the coarse sanding drum to sand the 1/4" dowels to nice pencil-looking points on each end.
Before sharpening them, I realized they are longer than I wanted because I changed how they are going into the cake. So I took a grinding wheel and proceeded to use it to cut through the dowel rod. It actually worked on the 1/4" dowels. Not so much on the 1/2" ones. I will have to finish those with a hand saw that I have in my camping arsenal.

Finally.........on to the trees!!!!
I took some 24 gauge wire, cut it to various lengths, folded it in half and covered them with brown floral tape. These were my branches for my trees. I also covered the dowel rods (the 1/4" ones) first in green floral tape and then in brown floral tape. Mostly only taping the part that was going to be exposed (9"). I then started at the top and taped the branches on, hopefully in a random pattern. I did three trees, and they don't all look the same (Yeah!). These are supposed to be Sitka Spruce trees (the state tree of Alaska). Which means......they have pine needles and not leaves. Yeah......pine needles. That I am nutso enough to try and pipe onto the branches. But alas, that is for another day.

Friday, April 23, 2010
They are done!!!!!!!!!!!!!!!
The flowers, not the cake, lol!
I finished dusting the flowers from yesterday, and also dusted the ones that I put on wires. Here are some before and after dusting pictures.


It always amazes me how much life the flowers take on after being dusted!!
After dusting them all, I pearl dusted them (much quicker process, lol) and steamed them to give them a glossy sheen. Here are some before and after steaming pictures.


I then made some royal icing to pipe the flower centers with. I used a little more water than the recipe called for, and got a marshmallow-like consistency. I then colored part of it yellow using Lemon Yellow and Egg Yellow from Americolor (my favorite colorings by the way!). After coloring the icing, I filled a piping bag and started to pipe centers on the flowers.
Then noticed that all my centers had points. So, I took a damp paint brush to brush away the point. However, when the center dried there was a depression in it. Well, that's not good! Having to choose between points or depressions was a viable option here. So, I emptied my piping bag back into the container with my yellow icing, and thinned it down almost to run-sugar consistency. I thinned it until it just 'melted' back into itself.
Made a new piping bag, filled it and tried piping centers. They came out great! The points 'melted' back into themselves just as I wanted. Yeah!!!! So, I proceeded to pipe the centers on all 450ish flowers. It went surprisingly fast.
After piping all the centers, I pearl dusted them, then steamed them. Let me tell you - steaming flowers that are in formers and NOT on wires is no easy feat! There's a fine line between tilting the formers enough to get the steam to hit the flowers and the flowers to not fall out and break. Also tilting the steamer enough to head the steam to the flowers and not let droplets of water to fall on the flowers and melt them. Let's just say there were a few casualties in the process, lol. Here's what they looked like after steaming:

When It Rains It Pours
No, not the weather (although it was storming pretty good today). Distractions and delays - ugh!!
Realized last night, that the blue petal dust I've been using to dust the Forget-Me-Not's isn't enough to finish them all. So, made the decision to head off to a local cake supply store to get some more this morning.
Started this morning by getting up early, having some breakfast, and doing some much-needed duties for the cake group I belong too. Then jumped in the shower real quick, then called the store to see if they had the color I needed. The store is an hour away, which I have no problem with, just don't like to drive out there for no reason. I called and they had the color in stock that I needed (Yay!)
I got ready and left. Took me about an hour or so to get there. It was nice and sunny when I left my house. On my way there, it started getting real dark outside. Then it started thundering and lighting and pouring rain. Well, I finally got to the street the store is on, and noticed that there is a cop directing traffic instead of the traffic light. I don't think too much about it, until I pull up to the store and everything is black. Then it dawns on me, the storm must have knocked the power out. I waited for a little bit to see if the power would come back (the storm seemed to be clearing up a bit). I finally gave up and headed back home.
Now I'm freaking out, because I don't know where else to get this color from. I start calling everyone in the area that I know, and have a phone number for. I finally get a hold of a lady that lives down the street from me who has a similar color to what I was using. So, I stop at her house to look at it. It seemed the right shade, so I told her I'd replace it for her, and headed home.
I had a little bit of the original color on my work surface, so I finished dusting a few flowers with it. Then decided the colors looked similar enough that if I mixed them, it'd look the same. So I mixed them, then dusted a flower with it. They were not the same color.
Now at this point I could have freaked out, because I mixed ALL the new color and ALL of what I had leftover of the original color. Instead of freaking out, I started thinking if having two different colors would be ok. These flowers are for the edge of the cake boards, and since there are three cake boards I originally thought I would do the darker color on one board and the lighter color on the other two. I called Janet for her opinion, and we decided it would look nicer to have three different shades, one on each cake board. So, I dusted enough of the medium color for the middle cake board, and mixed some corn starch into the new color to lighten it up some. I tested it on one of the flowers, and had to add more corn starch to produce the contract in colors that I wanted. The lighter color was perfect and I started dusting the flowers for the third cake board. I have 70 flowers left to dust then the centers can be piped and they can be pearl-dusted and steamed.


While dusting flowers, I happened to move a stack of already-dusted flowers and noticed that the face cloth they were sitting on had blue dots all over it (this should have been clue #1 that something was wrong).

I was looking at the trays of flowers and noticed that the bottom one had holes in the center of all the flowers (clue #2).
It took a few seconds, but I managed to put it all together (do you see where this is heading?).........I put the try of dried dusted flowers on top of a WET facecloth last night. Of course it was dry by today......but not before melting holes in 25 of the 30 flowers in the tray. So now, I don't have many extra flowers, and have to be very careful not to break anymore of them.
Here's hoping tomorrow goes better!
Wednesday, April 21, 2010
A Little Distraction and Humor
I got a few hours work done on my flowers today. I finished the 38 that I had left, and also started dusting the ones that are done. I picked a very nice blue and went at it. I suspect I'm going to have to go buy more of it before the flowers are done. I got about 180 dusted, and only broke 15 of them. I know I know......that that great, but you have to be positive sometimes, lol. I also realized I have about 80 extra flowers, so here's hoping there's some left to decorate the table with! There are no pictures tonight, simply because I forgot to take them and I'm too lazy to go do it now, lol.
Instead I thought I'd tell you all about a favorite website of mine: www.cakewrecks.com It is absolutely fabulous! Also amazing to know that the creations on this site are actually sold!! (and more shocking - people pay money for them!)
A few months ago, one of their posts linked to a pretty funny song that I believe was made by a loyal blog reader. It took the Lazy Town (from Nickelodeon) song "Cookin' by the Book" and spoofed it with "Wreckin' by the Book". Here are the links to both songs:
Nickelodeon's Lazy Town "Cooking by the Book"
Cakewreck's "Wreckin' by the Book"
The songs have a surprisingly catchy tune which I was shocked to realize I was singing to myself the other day!!
Enjoy the videos!!! I'll have pictures of the flowers tomorrow for you!
Tuesday, April 20, 2010
What Can Happen in 8 Hrs....................
Yesterday I told you about the flowers I was going to be making (all 464 of them). Well, I spent the better part of 8 hours working on them today. I'm happy to say that they are almost all done. I just couldn't sit there any longer doing them, lol.
Here are some pictures of what I was doing:


Here they all are stacked up in formers to dry:

Here are some pictures of what I was doing:


Here they all are stacked up in formers to dry:

Sunday, April 18, 2010
Flowers, flowers, flowers...............

I managed to get the rest of the little Forget-Me-Not's done (Yeah!!!) So now I have 147 flowers done. They still need to be dusted, wired and taped together.

As if that wasn't enough, I decided to cover the sides of my cake boards with Forget-Me-Not's also. These will be a little bigger than the ones I've been doing.

I have 3 cake boards that they are going onto: 20", 22" and 24". You may be wondering how many flowers it's going to take to cover the sides of the boards.....
Fortunately for you (unfortunately for me, lol) I have the aswer!!! 420. Yes, 420 of them! So glad I'm good at math and used it to figure this out rather than having to make them to find out, lol. I just so happen to have flower dryers that will hold 464 of these. So that's how many I'm making. Why so many extra you might be wondering......well, 1) breakage mostly and 2) I can use the extras for table decorations :D

In case most of you are wondering the general "shape" and layout of the cake, here's a picture of the naked dummies. No, the Wilton columns are not part of the finished cake, they are just what I had to visualize the spacing.
My Airbrush Saga
For those of you who read about by airbrush "fun" before Easter, I thought I'd let you all know how it went. Turns out I'm an idiot, lol. The air was supposed to be flowing throw the gun and out the nozzle end. The trigger actually only controls the food coloring being released into the stream of air. After talking with a few friends that have airbrushes, it was determined that the needle of my airbrush was in too much and needed to be adjusted. I went home and tried it. Lo and behold, it WORKED! I spent a few hours playing with the airbrush and a few dummy cakes from classes I've taken.
In order to spare the rest of my kitchen from the onslaught of the food coloring, I purchased a big cardboard tri-fold display from the craft store (think Science Fair Project stuff). I set that up behind the cake, laid some newspaper on the table and had a blast. It was so cool!!! I've used an airbrush a few times before but never actually owned one! I tried a few techniques that I want to do on my Alaska wedding cake, and they came out pretty good.

I also (accidentally) figured out how to make fireworks with the airbrush!! Hold the gun REAL close to the surface you're airbrushing, and pull the trigger back fast. The air causes the liquid color to spread in a pattern very similar to fireworks!
My cake is finally started!
Ok..............you're never going to believe this!! I STARTED ON MY CAKE TODAY!!!! I know.....it's about time, lol. I leave for the cake show is 17 days (yikes!!), and won't get anything really done on Monday - I'm going to the Sox game :D
I did some more research on stuff for the cake today, and also started making the flowers for it. I'm making Forget-Me-Nots. They are the state flower for Alaska. I borrowed a plunger cutter from a friend to make them, since they are very tiny. My first dilemma came about when trying to figure out how to attach wire to the small flowers. Normally I'd thread the flower onto the wire, and the wire would form the bud of the flower, but the flowers are very tiny and I didn't think that would work.
There is a cake decorating website that I belong to, so I went there and posted the question to everyone there. I also posted on my Facebook page asking for suggestions. I got lots of great suggestions from both places and ended up using some flower stamens that I had as the centers and put the flowers on them.
 The flower stamens are white, and the flower centers are yellow. So, I tried coloring the stamen with an edible marker, and that worked ok. Except I had about 150 stamens to color......so I mixed some food coloring with vodka and dipped the stamens into the mixture to color them. It worked awesome!!! I dipped them all and stuck them into some styrofoam to dry.


In the meantime, I colored some gumpaste to the right shade of blue (used sky blue and turquoise), rolled it out, then ran it through the pasta attachment for my kitchenaid (number 5). Ran it through, put it into the Wilton practice sheets I have (they are fabulous for keeping the gumpaste from drying out, especially with a wet face cloth over them).
Thought I'd be smart and cut out all the blossoms from one practice board so I could just thin them and attach them to the stamens..................except they dry out when you do that. Yes, I found that out the hard way. Had to throw away and entire sheet of flowers. No, I didn't count them, that would have been too depressing. So, I cut each flower out as I did them. I have 147 stamens, and got 74 flowers done. I have the rest to finish tomorrow.

Did you start on any projects today?
I did some more research on stuff for the cake today, and also started making the flowers for it. I'm making Forget-Me-Nots. They are the state flower for Alaska. I borrowed a plunger cutter from a friend to make them, since they are very tiny. My first dilemma came about when trying to figure out how to attach wire to the small flowers. Normally I'd thread the flower onto the wire, and the wire would form the bud of the flower, but the flowers are very tiny and I didn't think that would work.
There is a cake decorating website that I belong to, so I went there and posted the question to everyone there. I also posted on my Facebook page asking for suggestions. I got lots of great suggestions from both places and ended up using some flower stamens that I had as the centers and put the flowers on them.


In the meantime, I colored some gumpaste to the right shade of blue (used sky blue and turquoise), rolled it out, then ran it through the pasta attachment for my kitchenaid (number 5). Ran it through, put it into the Wilton practice sheets I have (they are fabulous for keeping the gumpaste from drying out, especially with a wet face cloth over them).
Thought I'd be smart and cut out all the blossoms from one practice board so I could just thin them and attach them to the stamens..................except they dry out when you do that. Yes, I found that out the hard way. Had to throw away and entire sheet of flowers. No, I didn't count them, that would have been too depressing. So, I cut each flower out as I did them. I have 147 stamens, and got 74 flowers done. I have the rest to finish tomorrow.

Did you start on any projects today?
Tuesday, April 13, 2010
Saying Good-Bye to Cakes Gone Bye
Ok, so the title is a little quirky but it's the best I could think of, lol. It's been over a week I think since I last posted. You'd THINK I was too busy with my cakes for the cake show coming up in Maryland on MAY 1ST, wouldn't you??? Well, no such luck, lol, just been lazy and trying to get motivated to start them. I know I know.....I need to get my butt moving if I'm going to have cakes to bring to the show. I leave two weeks from Friday, that means I have 16 DAYS (holy crap!!! it seemed like longer!!) to get a 3 tier wedding cake done and a Lambeth style cake done (a lot like that one I posted a few weeks back from a class I took).
So today, rather than actually starting on the cakes, I decided to straighten up the mountains of cake stuff that is threatening to take over the house. I started with deciding to purge some old competition cakes. I had a dilemma, however, on how to decide what to purge. I needed a "set of rules" so-to-speak, rather than arbitrarily deciding what to keep and what to toss. I just can't do arbitrary, lol. After much thought I decided to keep only the cakes that I have won a trophy for. It cut waaaaaaaay down on the number of cakes to store!! I am keeping 2 out of 9 or so cakes. There are some gumpaste flower arrangements that I've done, and all of those I'm keeping. They are too pretty, and I can always pot them as decorations if I choose too.
How do you purge cakes you might be asking yourself.....well, it's pretty simple really. There are two ways: tossing in the trash (which just seems wrong, lol) and melting the fondant off (added benefit of being able to reuse the dummies). I chose to melt the fondant off. In the shower. It actually worked fantastically! I put the water almost as hot as it would go, put 2-3 cakes in the tub and turned the shower on. In about 20 minutes or so most of the fondant had been melted off and it took very little effort to take the rest off. It wasn't quick though, lol. I got 9 dummies uncovered in about 3 hours. I still have 6 or 7 left to do tomorrow.
So that was my fun this evening. I plan to finish them up tomorrow, and hopefully get started on the cakes on Thursday!
Did you straighten or clean something today?
Sunday, April 4, 2010
My Easter Cake is done!!
Happy Easter everyone!
On the off chance that you're all wondering how the Easter cake came out, well...............it came out pretty good.
No airbrush yet :( Can't figure out what's wrong with it. If anyone can help, it seems as though whatever part the trigger moves to adjust the air flowing through the gun is stuck wide open.
So, I decided to try hand painting some flowers on the cake. I found a picture online (yeah for free coloring pages!) and printed it out. My original plan was to transfer the design to the cake and paint it. However........not so easy on fondant that has sat out overnight on the cake. Sooooooooooo, I went for it and painted it freehand on the cake. It doesn't look half bad if I do say so myself :D I also decided it needed some grass and little flowers along the bottom of the cake.
Here's what it looks like:


Best laid plans.......................
Sorry I have been MIA for a while......had a cake meeting last weekend and kinda been taking it easy since then.
So, I have an Easter cake I'm doing for tomorrow. Lemon cake with buttercream filling and fondant covered. All was going well.....baked the cakes on Thursday night, leveled them today, made the icing, filled and crumb coated the cake. Then took out the new bucked of Fondx fondant that I bought a few weeks ago at the National Capital Area Cake Show. Opening a tub of fondant seems easy enough, doesn't it? That's what I thought too - until I tried to open it! You see, there ARE instructions on the top of it....however they really aren't that clear (at least to me they weren't). "To Open Break At Openings" or something like that.......except I couldn't find any openings!!!


Can YOU read the instructions on the cover (pic at left)???? They weren't much easier to read in person!
So, rather than flip out completely, I called a friend of mine that uses Fondx, and asked her how to open the damn thing. Once she told me, it was sooooooooo easy, lol! Apparently there were little 'notches' around the cover, you had to break through these to release the tension on the cover so you could open it. There were six of them, and the breaking and entering went pretty smoothly.
Ok, that fiasco is over with. I weigh out my fondant, roll it out and cover the cake without incident (shocking - I know!). I put my favorite border around it (Loooooooove tip #199). There is no other decoration on it as of yet because I WAS planning on using my new airbrush to have some fun with it (note I said WAS). So, I open up the airbrush kit that I bought in VA at the cake show a few weeks ago. Hook it all up and NOTHING, absolutely NOTHING happened. After taking apart the airbrush gun, I realized the hose still had kinks in it from being packaged up. Ok, so I unkink the hose and there is air flowing to the gun - Yeah!!! Only....now there's air flowing to the gun and also out the end - without the trigger being pressed. Yeah......not good, that's not supposed to happen. I figure, oh well, we'll see what happens and put a few drops of airbrush color into the cup. Press the trigger and nada, ziltch, nothing happens. NO color is coming out of my airbrush. I ended up cleaning it out best I could (unscrewing EVERYTHING) to make sure no color is trapped inside and going to gum it up or something. I went on my favorite cake decorating website (Cake Central) and asked for help from anyone that might have the same issues.

So, here my cake sits. Very white looking, and I'm trying to figure out what to do on it. I took a break for lunch to write this and think about the cake. I might try handpainting some Easter-y things on it. We'll see.
Well, I ended up going shopping with Janet. Then more shopping and finally dinner (Outback - Yum!!!!!)
We also brainstormed about my cake. Have I mentioned she's my awesomest (yeah, I know, it's not a real word) idea person ever! What ideas did we come up with??? You'll have to wait for my next post to find out (hahahaha!).
Subscribe to:
Posts (Atom)