Saturday, June 12, 2010

Cake Pictures!

I have pics!!!!!

The Vow Renewal and Party were great, even though it was a rainy day.  Did I mention that the party was OUTSIDE, and by the time we cut the cake, the flowers literally melted in my hands and the fondant was sticky!

So, without further ado, here are the pictures!

Cake Table


Top View of Cake


Side View of Cake


Gumpaste Bow Cake Topper


The three flower
arrangements that
adorned the bottom
layer of the cake


Flower arrangments
that adorned
the base of the
cake


The best laid plans..........

Where to begin.........how about.....it's 2:45am, cake was done at 2am.....should have been finished at 11pm!!!

How did this happen you ask?  Simple, really.  I started out with the original design for the cake, and like an idiot, decided to do something different.  However....the new design was not coming out very good at all (uneven drop strings, anyone?), so, to avoid more aggravation (believe me, there was plenty!) I back-tracked and ended up doing the original design.  This, by the way, added three HOURS to my working time!!  In the end, of course, it's all worth it because the cake is friggin awesome!

Here's how my day went, lol!

I procrastinated on Thursday and decided there was plenty of time to bake Friday morning.  I should have baked Thursday.  So, I got up this morning, an hour later than I wanted to, had breakfast and got to work mixing up cake batter and baking cakes.  Started about 11:30am, and by 2pm had all the cakes baked and the buttercreams made.  Yes, I said buttercreamS.  I make one for the filling and a different one to frost with.  Pulled out my Agbay (this is by far the BEST $$ I've spent on this entire caking hobby!), leveled and torted my cakes, filled and crumb coated them.  All went very smoothly and quickly.  While waiting for the cakes to cool, I covered the cake board in fondant, crimped the outer edge, and embossed with a small forget-me-not patchwork cutter.

Then it all started to go to hell, lol.  My icing was too stiff to frost with, and I couldn't use my filling to frost because it won't hold up under the fondant that I was putting on the cake.  So....I mixed the two together.  This actually didn't turn into a disaster thankfully!  While mixing I thought the cake might look nice if the icing was a pale blue, so I added some blue to the bowl and let the mixer color it.  The original plan was for white fondant with a navy candy-clay ribbon on it, and then drop strings piped in white over the navy ribbon.  It's pretty obvious I totally forgot about the fondant (even though I weighed the amounts out and kneaded them this morning).

I fill my 16" bag, outfitted with the cake icer tip (#789), and blue icing.  I proceed to ice the 12" cake.  I get the icing all on the cake, and am starting to smooth it out when I realize that my original design was to use fondant.  At this point I decide it might look good frosted in buttercream, with the rest of the design remaining the same.  So I ice and smooth the 12" and 8", then stack the 8" on the 12".  The candy clay ribbon is relatively easy to roll out and apply to the cake, except it won't adhere to the buttercream!  It eventually does, so that's good.

I get the ribbon applied and decide it would look nice if the drop strings are pale blue like the icing.  So I load a bag up with the pale blue buttercream and proceed to pipe drop strings.  Only thing is.....this buttercream apparently has a lot of air bubbles in it, so the strings keep breaking.  Add this to the fact that I apparently can't seem to pipe consistent drop strings, and you get one aggravated po'd person!  I lose it.....the strings look horrendous, the candy clay looks WET where it's touching the buttercream, and it's not looking as pretty and it was supposed to.  I actually started crying.  Oh, and somewhere in there, I assembled the bow for the top with buttercream.

I realized I wouldn't be happy, nor satisfied unless the I went ahead with my original design.  So, I pulled the drop strings off, unpealed the candy clay, took the bow off the top of the cake, and took the 8" cake off the 12" one (not for the faint of heart!).  Pulled out my silicone mat and silicone rolling pin, and the pre-weighed  fondant.  Rolled out the fondant and covered each cake.  Re-stacked the cakes, re-rolled more candy clay and attached it to each tier.  I spritzed the candy clay with a light mist of water to help it adhere to the fondant.  It worked pretty well, and they adhered nicely.  I also made a batch of royal icing, since I knew I'd have better luck piping drop strings with it.  Outfitted a bag with a coupler and a PME tip 1.5 with the royal icing and started piping drop strings.  After a few I realized they were still uneven, so I took them off and made a template with some parchment paper, so I knew how long each string should be.  Then marked pin holes along the top of each ribbon at 1.25" intervals.  Piped the drop strings with no real trouble this time - YAY!

So this brings us back to where we were when I basically ripped apart the cake......3 HOURS ago!  However, it looked much better done with the original design.  I also pulled apart the bow, since the buttercream it was put together with wasn't going to harden and hold it together.  I re-assembled it using royal icing and set it aside.

Then I got to do the fun/pretty stuff, lol!  I pulled out the candy clay rose I made a few days ago, along with some hydrangeas that were made a few years ago, some forget-me-not's from the Alaska cake I brought to Maryland, and a small package of royal icing daisies I bought the other day (hey, they looked good!).

There were six places on the cake that had to have flowers (the seams in the candy clay), so I started there.  I put together some arrangements, I don't think there are any two that are the same. To do the arrangements I had to pull apart the hydrangeas and forget-me-not's so I had small bunches rather than big ones.  I put the six arrangements on the cake and it looked really nice!  I thought putting more flowers might detract from the cake, so I pulled out my glitter dust and dusted the cake to make it purdy :D.

I put the bow in a 12" round pan and put it in a box for transport, the extra flowers and tools went into another box in cake I decide more flowers are needed tomorrow when the bow is put on the cake, and the cake itself got boxed up in a cardboard box for transport.

Sorry that there are no pictures....I didn't realize the camera was upstairs until I came up here at 2:45am (OMG, that was an hour ago!)

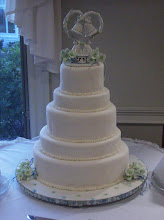
Will take copious pictures tomorrow when the bow is put on the cake!!!

Wednesday, June 9, 2010

Candy Clay...........Friend or Foe?

So, I did make the candy clay yesterday like I planned to (amazing, I know!).  Don't have pictures of the process, because I forgot to take them, but I do have a picture of the light blue clay that I used today!


I made two batches, light blue and dark blue.  Do you know they don't sell blue candy coloring in the craft store?  Well....they don't.  Fortunately, they do sell candy melts in these colors!  I bought a 16oz bag of each color, along with one in white, in case the shades needing toning down (I decided they didn't, btw, lol).


Making candy clay is actually spectacularly easy to do, especially with a microwave!  Melt the 16oz of candy melts in a bowl in the microwave.  I did increments of 20-30 seconds, depending on how impatient I was feeling.  Once the melts are all melted, you stir in 1/3 cup of corn syrup.  As you stir, something quite amazing happens.  It doesn't look like much is going to happen at first, then all of a sudden the bowl of liquid candy melts becomes a sticky ball.  It is almost the corn syrup is causing the melts to seize, much like real melted chocolate does when water is introduced.  I actually have never seen chocolate seize up, so really have nothing to compare this too, other than it's the best explanation I can think of.  You then wrap the molten ball of candy melts in plastic wrap and let sit at room temperature for 24hours for it to 'cure'.  Then you're ready to use it!


Today's project was to use the light blue candy clay to make roses.  I purchased Hershey's Kisses to use as the bases.  Yeah yeah, I know it's the lazy way out, and I could have made the rose bases with candy clay.  However.....I am about as lazy as they come.  If I can find an easier way to do something, I will (competitions excluded for the most part, lol)! 


I took a round toothpick and shoved it into the bottom of each Kiss.  A word to the wise.....it is much easier to put the toothpick in BEFORE unwrapping the Kiss!


I decided to make 18 roses, so 18 of the Kisses got toothpicks shoved into them.  Against my better judgment, I will probably end up eating the remainder of the bag, lol.


Tools for working with Candy Clay are similar as those for working with gumpaste.  You have to be gentler with the candy clay, as it will melt if you continue holding it.  Keep an ice pack handy if you have furnace hands, as I do.  Candy Clay is not easy to work with when it melts in your hands!

I used rose petal cutters from FMM.  You don't have to use cutter, you can free-form the petals yourself, but given the inferno that is my hands, I figured I'd have no petals.  Plus, I like to know everything started the same size, lol.

I dusted my work surface with cornstarch, and rolled out the candy clay.  You can't roll it as thin as gumpaste, but that's fine, you thin it out a bit with your fingers.  I rolled it out to an even thickness that I was happy with.  I don't know how thin, I'm not a good judge on that kind of stuff.  I used the 3 smallest sizes of the FMM cutters.  For each petal that I cut out, I used my fingers to thin down the edge of the petal, very carefully to avoid melting it.


 I first used the 2nd smallest to cut out a petal for the center of the rose, and put that on around the point of the Kiss.


Then I used the smallest cutter and cut out 4 petals for each flower.  I put two on, opposite each other, and the other two over the seams of the first two.


Then I cut out 6 petals with the 2nd smallest cutter and put 2 rows of petals on, 3 petals per row.  Lastly, I cut out 3 petals with the 3rd largest cutter and put these on as the last row of petals on the rose, being sure they covered the brown of the Kiss.


I also made pieces for a gumpaste bow this morning.  I usually make my own gumpaste, however I forgot to, so I took some Satin Ice fondant and mixed some gumtex into it.  It's a quick fix that actually works pretty well. 

My plan was to make two different colored blue gumpaste, and marble the two together.  It doesn't look marbled in the pictures, but is in person.  The bow is going on top of an 8" cake, so the bow is planned to be about 6" in diameter.


I made 16 bow loops - 8 from 5.5" strips of gumpaste, and 8 from 4.75" strips.


One of the shorter ones is an inch short because I screwed up measuring.  However, since there are plenty of loops I did not redo it. 


Then I made some bow 'strings' to be put on under the bow loops.  


I also made curliques out of the gumpaste to put somewhere on the cake.  I may make more once the cake is done and put the fresh ones on the cake to dry.


I used the linquini cutter for my Kitchen Aid to get uniform strips of gumpaste to use for the curliques.


The pasta attachment set, IMO, is indispensable if you're going to be making decorations out of gumpaste.


Next step is to bake on Thursday, and decorate on Friday, so stay tuned!!!

Sunday, June 6, 2010

Hello loyal readers!   As is apparent, I took a little (ok....a loooooong) break from caking after the last show.  I also realized that I never posted pics of the finished cake, so without further ado, here they are:

Front view of the cake, showing the table also. 

Table decorations are rock candy (purchased from Cracker Barrel - loooooooooove Cracker Barrel by the way.....there is no better road-trip restaurant IMO!), and small forget me knots, sprinkled on the tablecloth. 

Tablecloth is a blue satin material with diamond-studded toule over it, edges binded with satin ribbon.


Here are pictures of each 'side' of the cake:


Here is a closeup of the igloo, trees and totem pole.  There is also rock candy on this level of the cake to simulate ice:

Last but not least, the polar bears and flowers from the top of the cake.  Don't you just love the polar bears?!?!  I do, they are so cute!!!!


There will be more posts coming this week......I'm doing a 10th anniversary cake for my cousin and his wife for the 12th of June, so there will be a flurry of cake activity this week!!!