Hello Everyone,
I have been absent for a very long time. What can I say, life happens. I have decided to combine the three blogs I am (not) maintaining into one. I hope you will come visit me there!
Chelle's Bakery of Life
~Chelle
Tuesday, January 29, 2013

Wednesday, May 2, 2012
The end is in sight!!!!!!
So, I actually got quite a bit accomplished last night on the cakes!
I got the borders on all the cakes piped, as well as the side decorations for one of them. I also got the topper finished too! In trying to get as much done last night as possible, I put the ribbons on the cake boards (I usually leave this for the last step). I also got what I could packed up (flowers, table decorations, etc).
I just wrote out a to-do list for what is left, and there isn't much!
Tonight:
- Embellish borders (had to wait for last night's borders to dry)
- Box up cakes (two) for transport
- Iron tableclothes and figure out how to transport wrinkle-free
- Pack the rest of the cake stuff for the show
- Pack clothes and suitcase
- Pack non-perishable food
Tomorrow:
- Clean out car and remove back seats
- Pack everything into the car
- Assemble perishable food in refrigerator
- SLEEP!!!!!!!!!!
Friday
- Get up early, lol
- Pack food into cooler and put in car
- Go have fun! :)
~Chelle
I got the borders on all the cakes piped, as well as the side decorations for one of them. I also got the topper finished too! In trying to get as much done last night as possible, I put the ribbons on the cake boards (I usually leave this for the last step). I also got what I could packed up (flowers, table decorations, etc).
I just wrote out a to-do list for what is left, and there isn't much!
Tonight:
- Embellish borders (had to wait for last night's borders to dry)
- Box up cakes (two) for transport
- Iron tableclothes and figure out how to transport wrinkle-free
- Pack the rest of the cake stuff for the show
- Pack clothes and suitcase
- Pack non-perishable food
Tomorrow:
- Clean out car and remove back seats
- Pack everything into the car
- Assemble perishable food in refrigerator
- SLEEP!!!!!!!!!!
Friday
- Get up early, lol
- Pack food into cooler and put in car
- Go have fun! :)
~Chelle
Tuesday, May 1, 2012
Sooo close...........
.........I wish it were further away! If you're asking 'What?'...the answer is the cake show I'm going to. This weekend. As in, I leave in 3 days (Friday morning). Are the cakes done? Nope, not one of them is finished yet - though they are pretty close to being finished. There were supposed to be four of them. There are now two. The first cake to be nixed was a Lambeth cake. I just did one not too long ago, so I was ok with nixing this one. The next one that got nixed is a buttercream cake. See...one of the requirements for Certification is to ice and decorate a buttercream cake. I need practice on this. Lots of practice, lol. So, I figured a great way to practice was to do one for the cake show. Only now, I don't have the time to get it done properly. Oh well, there's always another show!
I lost some time working on the cakes this weekend. I had planned on spending the whole day Saturday and Sunday working on them, and having them finished by Sunday night. Well....I had errands to run on Saturday, so that ate up about half the day. Then I learned Saturday afternoon that the wake for a friend's father was Sunday night. From 4-6, and it was approximately 3 hrs away from where I live. I had to go, not going was not an option. So, I got some little stuff done in the morning and headed off to pick up another friend and we drove out together. By the time I got home, I went to bed, lol.
No problem, I still had Monday, Tuesday and Wednesday night to work on the cakes. Thursday is out, I need to relax and get a good night's sleep (leaving my house at 5am to pick a friend up that's going with me). Then JEM texted and wanted to know if I could go to dinner Monday night. JEM is my best friend, and is now living in Utah. Yes, Utah. Her and her husband have been here for a few weeks because his father passed away. There flights back to Utah are today, Tuesday. The only time I had gotten to see them while they were here were for the wake and funeral, and when she asked about dinner there was no way I could say no. Unless something changes, the next time I'll get to see her is September (going to try for before that though!). So, we went out and had a great time. I would enter no cakes if it meant spending more time with JEM, lol.
So, here we are. Tuesday morning. I have tonight and tomorrow night to get things finished. I should be able to get it all done. I have table decorations picked out, just need to iron tablecloths. I need to pipe some borders on the cakes and embellish them a bit, and finish decorating one of the cakes. All the flowers are done and dusted. Those that can be packed up for transport are boxed up already. You know...when I write out the list it seems pretty short. But, I'm working until 6pm every night this week, and by the time I get home and have dinner I have about 2hrs a night to work. I may stretch that to 3 just to save my sanity!
Thursday night is reserved for packing the car and my clothes and stuff. I'm leaving at 5am Friday morning, picking my friend up at 7am and then we are headed to Westminster Maryland! We should be there about 2 or 3pm. I will post pictures Sunday night and let everyone know how the show went!
~Michelle
I lost some time working on the cakes this weekend. I had planned on spending the whole day Saturday and Sunday working on them, and having them finished by Sunday night. Well....I had errands to run on Saturday, so that ate up about half the day. Then I learned Saturday afternoon that the wake for a friend's father was Sunday night. From 4-6, and it was approximately 3 hrs away from where I live. I had to go, not going was not an option. So, I got some little stuff done in the morning and headed off to pick up another friend and we drove out together. By the time I got home, I went to bed, lol.
No problem, I still had Monday, Tuesday and Wednesday night to work on the cakes. Thursday is out, I need to relax and get a good night's sleep (leaving my house at 5am to pick a friend up that's going with me). Then JEM texted and wanted to know if I could go to dinner Monday night. JEM is my best friend, and is now living in Utah. Yes, Utah. Her and her husband have been here for a few weeks because his father passed away. There flights back to Utah are today, Tuesday. The only time I had gotten to see them while they were here were for the wake and funeral, and when she asked about dinner there was no way I could say no. Unless something changes, the next time I'll get to see her is September (going to try for before that though!). So, we went out and had a great time. I would enter no cakes if it meant spending more time with JEM, lol.
So, here we are. Tuesday morning. I have tonight and tomorrow night to get things finished. I should be able to get it all done. I have table decorations picked out, just need to iron tablecloths. I need to pipe some borders on the cakes and embellish them a bit, and finish decorating one of the cakes. All the flowers are done and dusted. Those that can be packed up for transport are boxed up already. You know...when I write out the list it seems pretty short. But, I'm working until 6pm every night this week, and by the time I get home and have dinner I have about 2hrs a night to work. I may stretch that to 3 just to save my sanity!
Thursday night is reserved for packing the car and my clothes and stuff. I'm leaving at 5am Friday morning, picking my friend up at 7am and then we are headed to Westminster Maryland! We should be there about 2 or 3pm. I will post pictures Sunday night and let everyone know how the show went!
~Michelle
Monday, April 16, 2012
If only things went according to plan................
.....it would be a refreshing change! The plan for one of the cakes for the upcoming cake show I'm attending, was to have daffodils on it. Now, I've never really made daffodils before - though I have taken a class with the awesome Kim Morrison. The one we made in class went great! However, the life-size one(s) I tried to make did not go so well.
I got my hands on some real daffodils, and promptly pulled one apart to trace and measure the petals and throat (or trumpet). I then cut out the throat shape and attempted to frill the edges and actually form the throat. All was going ok until I tried to close up the bottom of the throat....for the *&(*&%( life of me I can't figure out how to do it without the paste ripping! Sticking the (already) dried centers through it did not prove to help the situation at all. After about 4 or 5 attempts I went in search of alternate directions via the interwebs. I came across a technique where you take a ball of paste, and hollow it out into a trumpet shape. This worked better, but I was still not happy with the results.
Time to re-group and think of options! After much discussion with a friend, I settled on doing sunflowers. Have I made sunflowers before? Nope. Hey - it's how I roll! I do have Nic Lodge's instructions from his Potpourri of Flowers book. Since I had no appropriately sized styrofoam balls (for the center) and no chocolate fondant (again, for the center), I set about figuring out the petals of the sunflower. Nic's instructions call for 30 petals...PER FLOWER. I am making three flowers. That's NINETY individually wired petals. I found an appropriately sized petal cutter and set about making a ton of petals. I believe I have 95 or so petals. Got those done, and they are drying. Also made some sunflower leaves and those are drying as well.
Also got some hydrangea blossoms made this weekend. They are GORGEOUS!!!!! They are light green and blue.
The plan tonight is to get the sunflower centers made.....let's hope all goes according to plan! Assuming those get done, lol, the petals and leaves will get dusted also. HOPEFULLY all can be assembled tomorrow, but if not, there's some stuff I can switch around in my plan.
~Chelle
I got my hands on some real daffodils, and promptly pulled one apart to trace and measure the petals and throat (or trumpet). I then cut out the throat shape and attempted to frill the edges and actually form the throat. All was going ok until I tried to close up the bottom of the throat....for the *&(*&%( life of me I can't figure out how to do it without the paste ripping! Sticking the (already) dried centers through it did not prove to help the situation at all. After about 4 or 5 attempts I went in search of alternate directions via the interwebs. I came across a technique where you take a ball of paste, and hollow it out into a trumpet shape. This worked better, but I was still not happy with the results.
Time to re-group and think of options! After much discussion with a friend, I settled on doing sunflowers. Have I made sunflowers before? Nope. Hey - it's how I roll! I do have Nic Lodge's instructions from his Potpourri of Flowers book. Since I had no appropriately sized styrofoam balls (for the center) and no chocolate fondant (again, for the center), I set about figuring out the petals of the sunflower. Nic's instructions call for 30 petals...PER FLOWER. I am making three flowers. That's NINETY individually wired petals. I found an appropriately sized petal cutter and set about making a ton of petals. I believe I have 95 or so petals. Got those done, and they are drying. Also made some sunflower leaves and those are drying as well.
Also got some hydrangea blossoms made this weekend. They are GORGEOUS!!!!! They are light green and blue.
The plan tonight is to get the sunflower centers made.....let's hope all goes according to plan! Assuming those get done, lol, the petals and leaves will get dusted also. HOPEFULLY all can be assembled tomorrow, but if not, there's some stuff I can switch around in my plan.
~Chelle
Friday, April 13, 2012
Eeeeek!
I am planning entries for a cake show in May. I finally sat down to work out a schedule to get everything done on time.....and guess what?? The show is in three, yes THREE, weeks! Yikes! How did that happen??? Last time I looked it was 6 weeks away. Oh, and did I mention I doing FOUR entries?!?! Well, four is what's planned, but I've learned over the years it's quality over quantity! So, four are planned, and I will make a valiant effort to put forth my best work for them all, but if some don't get done, they don't get done.
I am doing a wedding cake (3-tier), an any occasion cake (2-tier), another any occasion cake (1-tier) that will be buttercream, and an International/Special technique cake (1-tier) that will be lambeth.
Thankfully I have no plans for any weekends (and need to keep it that way!), so between working after work and having weekends free, I should have enough time to get it all done. Just need to stick to the schedule I made!
I'll give a brief description of what's going on the cakes:
Wedding Cake: oriental stringwork, gumpaste daffodils, stephanotis, and hydrangea
Tiered Any Occasion: quilting, piping, gumpaste bow
Non-Tiered Any Occasion: buttercream piping
Int/Spec Technique: lambeth
Wish me luck! I'll try to post every few days or so and let you know how the plans are coming. I may or may not include pics - I haven't decided....it also depends on if I remember to take the pics, lol.
~Chelle
I am doing a wedding cake (3-tier), an any occasion cake (2-tier), another any occasion cake (1-tier) that will be buttercream, and an International/Special technique cake (1-tier) that will be lambeth.
Thankfully I have no plans for any weekends (and need to keep it that way!), so between working after work and having weekends free, I should have enough time to get it all done. Just need to stick to the schedule I made!
I'll give a brief description of what's going on the cakes:
Wedding Cake: oriental stringwork, gumpaste daffodils, stephanotis, and hydrangea
Tiered Any Occasion: quilting, piping, gumpaste bow
Non-Tiered Any Occasion: buttercream piping
Int/Spec Technique: lambeth
Wish me luck! I'll try to post every few days or so and let you know how the plans are coming. I may or may not include pics - I haven't decided....it also depends on if I remember to take the pics, lol.
~Chelle
Wednesday, March 14, 2012
Garden State Cake Show - Burlington NJ
This past weekend, I traveled to Burlington NJ with some friends of mine to attend the Garden State Cake Show. This is the second year we've gone (I believe it's the show's third year, but I may be wrong). I have to admit, I was skeptical about going this year since last year was not the experience I had expected. I went this year because friends asked me to go (I would not have initiated the idea to go). I was pleasantly surprised at how well-run the show was after last year's experience.
It is a rather small cake show (compared to others I go to) but has a good number of entries, vendors and classes available. The friends I went with took a couple of classes while at the show: a cake decorated using Jacobean cutters and a high-heel shoe class. I, personally, don't get the fascination with "shoe cakes" but the shoes were very nice that they made.
Knowing that I wasn't taking any classes, I decided to bring along some stuff to keep me occupied. I have been neglecting drawing out the collars for the Nirvana part of my Certification cake, so I brought that stuff with me. I did manage to draw out the collar and side panels, as well as decide what size dummies to use.
~Chelle
It is a rather small cake show (compared to others I go to) but has a good number of entries, vendors and classes available. The friends I went with took a couple of classes while at the show: a cake decorated using Jacobean cutters and a high-heel shoe class. I, personally, don't get the fascination with "shoe cakes" but the shoes were very nice that they made.
Knowing that I wasn't taking any classes, I decided to bring along some stuff to keep me occupied. I have been neglecting drawing out the collars for the Nirvana part of my Certification cake, so I brought that stuff with me. I did manage to draw out the collar and side panels, as well as decide what size dummies to use.
~Chelle
Wednesday, February 29, 2012
Certification
You might be asking yourself "What is Certification?"
If you are, I can answer that! If you're not, then stop reading, lol!!!!!
The international cake group that I belong to has devised a Certification program to be certified as either a Master Sugar Artist or Sugar Artist. There are pretty detailed rules regarding the test.
In a nutshell, I will have to completely decorate a three-tiered cake, a non-tiered cake and a non-cake display piece in the span of 8 hours. Yes, you read that correctly 8 HOURS.....not 8 days, lol! Very little can be done ahead of time (the point is to see how well and quickly you work). Of the four cakes two can be iced at home and two have to be iced at the test. One in buttercream and one in fondant. All cake boards can be fully decorated ahead of time.
To decorate the cakes and display piece, you have to chose 8 decorating techniques from a list of about 30-40 techniques, arranged in categories by skill level. They range from the simple (simple stringwork and piped flowers) to the complex (Lambeth and Nirvana). There are particular rules about how many techniques in each category can be picked, etc.... but I don't want to bore you with the fine details. The 8 techniques you choose will be the ones you are judged on. You can incorporate other techniques in your pieces, but only these 8 will be judged, the others will count towards your overall asthetics score.
I have spent a few years working on which techinques I would choose, and figuring out which ones I needed classes in. I have taken classes in the techniques I needed to be better at, as well as those I haven't really done a lot of. I have been trying to incorporate some of the techniques in competition cakes that I have done over the last few years - though not in earnest. That's about to change!!!! My plans for my certification cakes have to turned in by April 1, 2013, so I have a little over a year to perfect my plans and practice them to make sure they are viable.
I have done competition cakes in the Nirvana style (and won two Best of Shows) and Lambeth (3rd place - know what needs to improve). I have gone back and forth a few times with the techniques and trying to design a cohesive cake that incorporates the techniques. I am happy to say that I have settled on a final design for the three tier cake! The only variable is the type of flower, but that's easy enough to change and adjust the colors accordingly.
So.....what skills have I chosen to be judged on? Those without a description can be searched online :)
Piped embellishments (piped swags, compound borders, etc...)
Fabric Effects in Rolled Fondant (bows, swags, etc....)
Brush Embroidery
Basic Stringwork
Gumpaste Flowers
Oriental Stringwork
Nirvana
Lambeth
I have a sketch drawn up on paper as well as the computer. My next step is to print it out and use colored pencils to get an idea of how it's going to look all finished.
So, after all this, are you wondering WHY I want to do this? I know I still ask myself that question, lol. I am doing this for me, and no one else. I'm not doing it to further my business (I don't have one) or my standing as a decorator, or for letters after my name - none of that matters to me. I'm doing it for me, to prove to myself that I can do it. Plain and simple!
I will try to keep you all updated on my progress through the Certification process!
~Chelle
If you are, I can answer that! If you're not, then stop reading, lol!!!!!
The international cake group that I belong to has devised a Certification program to be certified as either a Master Sugar Artist or Sugar Artist. There are pretty detailed rules regarding the test.
In a nutshell, I will have to completely decorate a three-tiered cake, a non-tiered cake and a non-cake display piece in the span of 8 hours. Yes, you read that correctly 8 HOURS.....not 8 days, lol! Very little can be done ahead of time (the point is to see how well and quickly you work). Of the four cakes two can be iced at home and two have to be iced at the test. One in buttercream and one in fondant. All cake boards can be fully decorated ahead of time.
To decorate the cakes and display piece, you have to chose 8 decorating techniques from a list of about 30-40 techniques, arranged in categories by skill level. They range from the simple (simple stringwork and piped flowers) to the complex (Lambeth and Nirvana). There are particular rules about how many techniques in each category can be picked, etc.... but I don't want to bore you with the fine details. The 8 techniques you choose will be the ones you are judged on. You can incorporate other techniques in your pieces, but only these 8 will be judged, the others will count towards your overall asthetics score.
I have spent a few years working on which techinques I would choose, and figuring out which ones I needed classes in. I have taken classes in the techniques I needed to be better at, as well as those I haven't really done a lot of. I have been trying to incorporate some of the techniques in competition cakes that I have done over the last few years - though not in earnest. That's about to change!!!! My plans for my certification cakes have to turned in by April 1, 2013, so I have a little over a year to perfect my plans and practice them to make sure they are viable.
I have done competition cakes in the Nirvana style (and won two Best of Shows) and Lambeth (3rd place - know what needs to improve). I have gone back and forth a few times with the techniques and trying to design a cohesive cake that incorporates the techniques. I am happy to say that I have settled on a final design for the three tier cake! The only variable is the type of flower, but that's easy enough to change and adjust the colors accordingly.
So.....what skills have I chosen to be judged on? Those without a description can be searched online :)
Piped embellishments (piped swags, compound borders, etc...)
Fabric Effects in Rolled Fondant (bows, swags, etc....)
Brush Embroidery
Basic Stringwork
Gumpaste Flowers
Oriental Stringwork
Nirvana
Lambeth
I have a sketch drawn up on paper as well as the computer. My next step is to print it out and use colored pencils to get an idea of how it's going to look all finished.
So, after all this, are you wondering WHY I want to do this? I know I still ask myself that question, lol. I am doing this for me, and no one else. I'm not doing it to further my business (I don't have one) or my standing as a decorator, or for letters after my name - none of that matters to me. I'm doing it for me, to prove to myself that I can do it. Plain and simple!
I will try to keep you all updated on my progress through the Certification process!
~Chelle
Tuesday, February 28, 2012
No, I haven't dropped off the face of the earth, lol!
Hello to everyone still reading this blog (if there any, lol). I haven't dissappeared, I've just been busy and though I've done some cakes, there haven't been too many. I am going to try to post more to this blog, since I will be working on more and more cake stuff in the coming year. I will try to post some pictures tonight of cakes that I have done.
I hadn't been posting as I did the cakes (especially the competition ones) because I had decided it was best to not "show my hand" to any potential judges beforehand. Well.......that led to me not posting at all, lol. So, judges be damned, I'm going to start posting again as I'm working on a project. :)
So....you might be wondering why I'm going to be busier with cake stuff in the next year or so (and if you're not, I'm still going to tell you, lol). Next summer (2013) at the Convention in Lexington KY, I am going to be one of the candidates for Certification. Yes....I've bitten the bullet and decided to do it! This wasn't a decision that was arrived at lightly....I have been thinking about it and learning about it for the better part of three years. I signed up after the Convention this past summer in Charlotte and my application was accepted. I will post more at a later date explaining Certification a little bit more.
I have deliberately not mentioned which Convention I am talking about, but those of you that are part of the international cake group that I belong too will be able to figure it out. Since I am a State Rep for a little while longer, I am choosing to not have this blog associated in any way with the Group. I do not wish my rantings and such to reflect on the Group, therefore I am hopefully not creating a connection on this blog between me and the Group.
~Chelle
I hadn't been posting as I did the cakes (especially the competition ones) because I had decided it was best to not "show my hand" to any potential judges beforehand. Well.......that led to me not posting at all, lol. So, judges be damned, I'm going to start posting again as I'm working on a project. :)
So....you might be wondering why I'm going to be busier with cake stuff in the next year or so (and if you're not, I'm still going to tell you, lol). Next summer (2013) at the Convention in Lexington KY, I am going to be one of the candidates for Certification. Yes....I've bitten the bullet and decided to do it! This wasn't a decision that was arrived at lightly....I have been thinking about it and learning about it for the better part of three years. I signed up after the Convention this past summer in Charlotte and my application was accepted. I will post more at a later date explaining Certification a little bit more.
I have deliberately not mentioned which Convention I am talking about, but those of you that are part of the international cake group that I belong too will be able to figure it out. Since I am a State Rep for a little while longer, I am choosing to not have this blog associated in any way with the Group. I do not wish my rantings and such to reflect on the Group, therefore I am hopefully not creating a connection on this blog between me and the Group.
~Chelle
Monday, September 5, 2011
A Stunning Wedding in July
I was asked a while ago (I think in January) by a friend of mine if I could do her wedding cake. I of course said 'yes', I love doing wedding cakes! We talked extensively via email, and as the day drew nearer, we met in person to go over flowers, colors, etc.... I brought some of my flowers to show her and we decided on the type of flowers (dendrobium orchids and tea cup roses) and the colors (teal-ish orchids and pink-ish roses).
 So, I set about making the flowers. The dendrobium orchids weren't so bad, I had the cutters for them and made the flowers.
I also made the tea cup roses, but unfortunately didn't take any pictures of them, lol. I ended up using a wire with a floral tape bud on the end of it and the smallest 5 petal cutter in the PME cutter set. Next time, I would use a slightly larger floral tape bud than the one that I used, but they turned out gorgeous!
After they were all dry, I dusted them. The orchids were dusted on the edges with a teal blue, and the roses with a pale pink.
Here's a close up of the top of the cake - you can see the dusted tea cup roses and dendrobium orchids:

I taped the flowers into a long lei-type vine and draped them around the cake, starting at the top. There were also smaller accent cakes that went with the big one. Those got a small spray of one orchid and one tea cup rose. For the sprays, I used some white and teal 1/8" ribbon and made some cute loops and taped them with the flowers.
Here is one of the smaller accent cakes:

The main cake was three layers, with alternating ribbon patterns around the bottom of the cakes. The bride requested real ribbon, so that's what I used. I took the color sample with me to the craft store, and luckily found the right color first shot!
I had wanted to elevate the main wedding cake and kind of have the accent cakes almost "under" the main cake. I started thinking on how I could do that. I ended up taking two 10" styrofoam round cake dummies, taped them together to get a height of 8". I then draped some white satin material over them, followed by some sparkly teal fabric that I happened to have laying around the house (amazing, isn't it? lol).
Here are some pictures of the finished cake and table all set up:


Let me tell you....as a cake decorator....it's pretty tough to impress yourself with a cake you've done. Believe when I say, I finished the cake table, put my stuff away and grabbed my camera. I turned around to take a picture and was absolutely STUNNED at how gorgeous the cake and table looked!
The last two pictures (and the one of the top of the cake earlier in the post) were sent to me by the bride. It was so bright outside that day, that my camera just didn't take very nice pictures. In her email with the pictures she also thanked me. With her permission I am sharing what she wrote. It just makes me, as a cake decorator, love what I do so much more when I get thanks like this from someone!

I also made the tea cup roses, but unfortunately didn't take any pictures of them, lol. I ended up using a wire with a floral tape bud on the end of it and the smallest 5 petal cutter in the PME cutter set. Next time, I would use a slightly larger floral tape bud than the one that I used, but they turned out gorgeous!
After they were all dry, I dusted them. The orchids were dusted on the edges with a teal blue, and the roses with a pale pink.
Here's a close up of the top of the cake - you can see the dusted tea cup roses and dendrobium orchids:

I taped the flowers into a long lei-type vine and draped them around the cake, starting at the top. There were also smaller accent cakes that went with the big one. Those got a small spray of one orchid and one tea cup rose. For the sprays, I used some white and teal 1/8" ribbon and made some cute loops and taped them with the flowers.
Here is one of the smaller accent cakes:

The main cake was three layers, with alternating ribbon patterns around the bottom of the cakes. The bride requested real ribbon, so that's what I used. I took the color sample with me to the craft store, and luckily found the right color first shot!
I had wanted to elevate the main wedding cake and kind of have the accent cakes almost "under" the main cake. I started thinking on how I could do that. I ended up taking two 10" styrofoam round cake dummies, taped them together to get a height of 8". I then draped some white satin material over them, followed by some sparkly teal fabric that I happened to have laying around the house (amazing, isn't it? lol).
Here are some pictures of the finished cake and table all set up:


Let me tell you....as a cake decorator....it's pretty tough to impress yourself with a cake you've done. Believe when I say, I finished the cake table, put my stuff away and grabbed my camera. I turned around to take a picture and was absolutely STUNNED at how gorgeous the cake and table looked!
The last two pictures (and the one of the top of the cake earlier in the post) were sent to me by the bride. It was so bright outside that day, that my camera just didn't take very nice pictures. In her email with the pictures she also thanked me. With her permission I am sharing what she wrote. It just makes me, as a cake decorator, love what I do so much more when I get thanks like this from someone!
Thank you so much for everything you did! The cake was PERFECT! And there wasn't a single complaint from the peanut gallery. The fondant, icing, and all the cakes tasted fantastic! It was so pretty, I just couldn't have pictured it differently. If you didn't know the flowers were sugar, you wouldn't be able to tell till you touched them. Unbelievable.
So, from the bottom of our hearts, thank you thank you thank you so much for everything.
~Chelle
Happy Mother's Day Mom!
When you hear the words "Mother's Day" in conjunction with 'cake', if evoked images of flowery cakes and whatnot (at least it does to me). Well, I asked my mom what kind of cake and decorating she'd like for Mother's Day. She is a very easy person to please most of the time. Her absolute favorite cake in the entire world is a yellow cake mix (undoctored) with Betty Crocker Milk Chocolate frosting on it.
Well...........how can you NOT give your mom what she wants for Mother's Day?!?!?!?!?!
Here's her cake!

She love it, and that's all that matters! (even though, secretly, it KILLED me to frost with canned frosting!)
~Chelle
Well...........how can you NOT give your mom what she wants for Mother's Day?!?!?!?!?!
Here's her cake!

She love it, and that's all that matters! (even though, secretly, it KILLED me to frost with canned frosting!)
~Chelle
Christening Dresses
One of my best friends had her daughter's Christening in June. She asked if I would make her cake, and I of course said yes! I was also asked to be her Godmother! I am sooooo excited!!!!
We talked about cake ideas, and settled on one that looked like her Christening dress. I baked sheet cakes for the basic dress, then carved the cakes to get a dress shape. The cake was white cake with a raspberry filling. I mixed Polaner All Fruit Raspberry into my regular buttercream recipe for the filling - it was sooooooooo delicious!!!!!!!!!
I put the cake together, covered it in fondant and dusted to look like the dress. It needed something else, so I added some of my leftover flowers from a previous competition to the cake. They were just what it needed!
Here are pictures of the finished cake:


~Chelle
We talked about cake ideas, and settled on one that looked like her Christening dress. I baked sheet cakes for the basic dress, then carved the cakes to get a dress shape. The cake was white cake with a raspberry filling. I mixed Polaner All Fruit Raspberry into my regular buttercream recipe for the filling - it was sooooooooo delicious!!!!!!!!!
I put the cake together, covered it in fondant and dusted to look like the dress. It needed something else, so I added some of my leftover flowers from a previous competition to the cake. They were just what it needed!
Here are pictures of the finished cake:


~Chelle
Ahoy Matey!!!!!!!
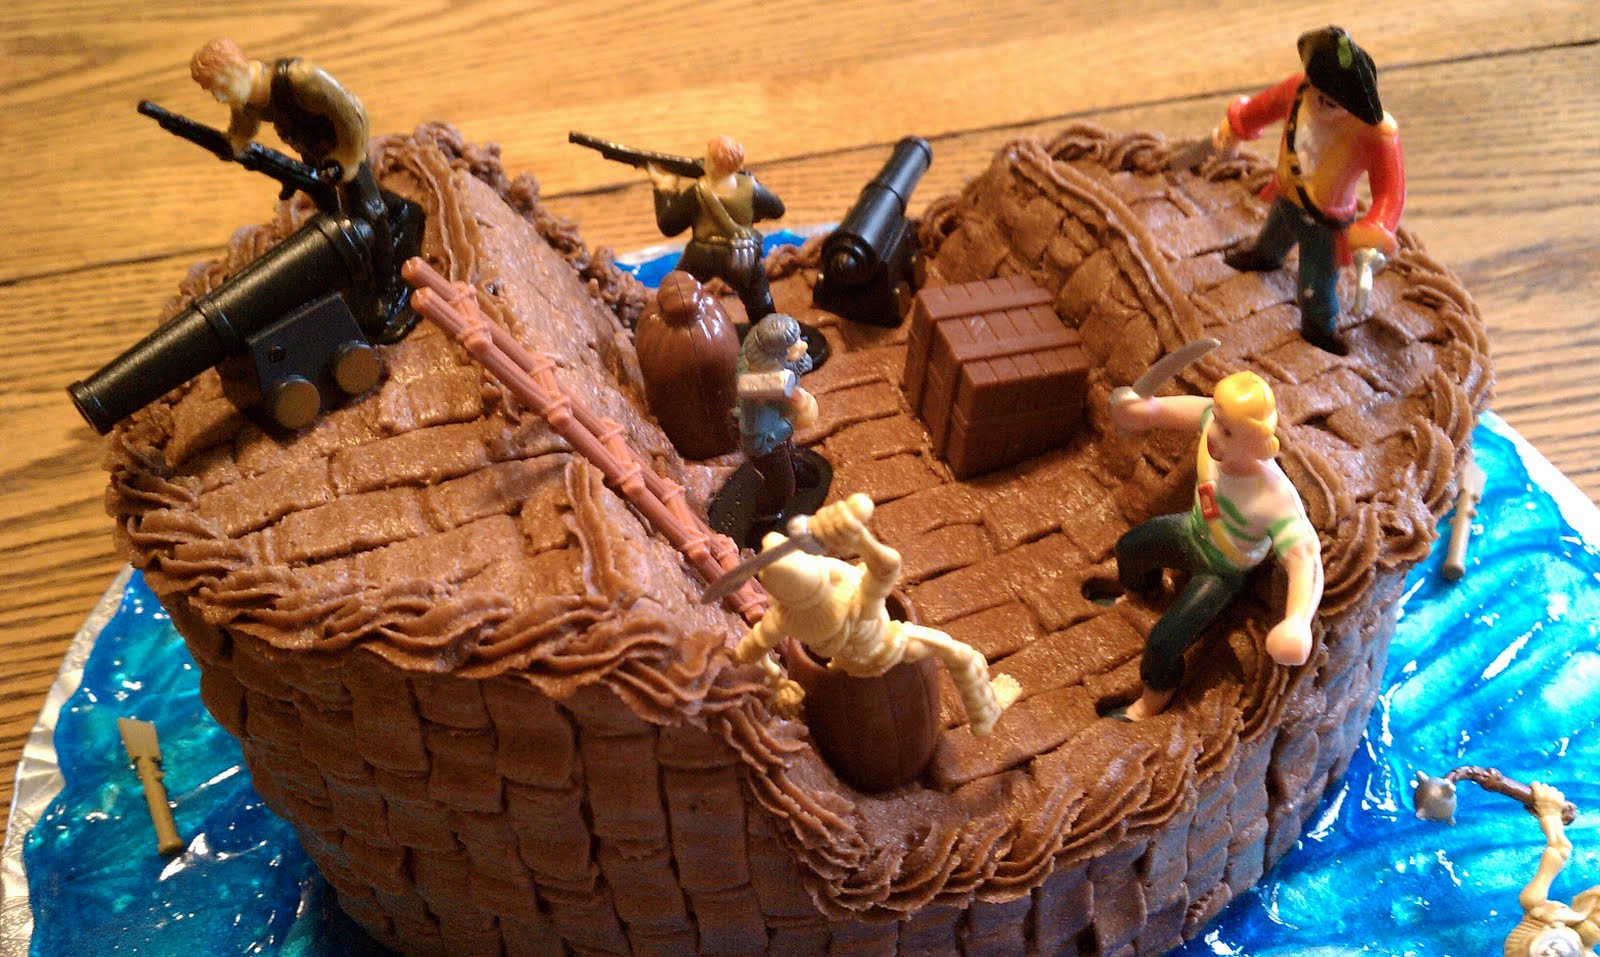
I was asked to do a Pirate-themed birthday cake....a pirate ship if I could swing it. So...I went off to iParty to see what type of pirate-y things they had (Yes, I think I made up a word there, lol). I found a package of pirate things (skeletons, cannons, treasure box, barrells, etc..) and also some individual pirates. So I bought an assortment and headed home.
I ended up using the small oval Wilton pans for the ship, since it did not need to feed a lot of people. I baked, cooled and stacked the cake, then cut/carved them into a ship shape. Buttercream was requested (rather than fondant), so I did an interpretation of the basket weave method of piping. I then placed the pirate items around the ship. Since pirate ships don't reside on land, I colored some piping get blue and spread it around the cake to resemble water. I put some skeletons in the water, as well as a rowboat with the treasure in it!
The recipient LOVED the cake!!!! Here are some pictures of the finished cake:


~Chelle
I ended up using the small oval Wilton pans for the ship, since it did not need to feed a lot of people. I baked, cooled and stacked the cake, then cut/carved them into a ship shape. Buttercream was requested (rather than fondant), so I did an interpretation of the basket weave method of piping. I then placed the pirate items around the ship. Since pirate ships don't reside on land, I colored some piping get blue and spread it around the cake to resemble water. I put some skeletons in the water, as well as a rowboat with the treasure in it!
The recipient LOVED the cake!!!! Here are some pictures of the finished cake:


~Chelle
Flower Cupcakes
Since we did not attend the baby shower for our friend's daughter, we decided to throw a small "Grandma Shower" for our friend. We had been meeting pretty regularly for lunches, so for one of them, we decided it would be a shower, lol.
Rather than make a cake for only 5 of us, I decided instead to do some cupcakes. I used purple and piped a generic flower on it, and then piped some leaves on it. I found some cute basket-type cupcake papers at a local cake store. The handles didn't really end up looking that nice, so I just used the wrapper part.

~Chelle
Rather than make a cake for only 5 of us, I decided instead to do some cupcakes. I used purple and piped a generic flower on it, and then piped some leaves on it. I found some cute basket-type cupcake papers at a local cake store. The handles didn't really end up looking that nice, so I just used the wrapper part.

~Chelle
Baby Shower "Cake"
Did you notice the "" around the word Cake in the title? Well......there's a very good reason for that. CakeCrazy and I decided to surprise our friend and show up the morning of the baby shower to help set up and everything. We knew if we told her, she'd tell us not to come to help. So, we decided to just show up, lol.
We didn't want to show up empty-handed, and wanted to get something for the mom-to-be.
We decided....since we are cake artists, why not a Diaper Cake!
We went out shopping to get the necessary supplies, then headed back to Cake Crazy's house to put it together.
We first had rolled all the diapers into cylinders, and held them together with hair elastics:

We then used a bottle as the center and 41 diapers surrounding it to make up the bottom layer. The middle layer consisted of 21 diapers and the top layer had 7 diapers around another bottle.
Cake Crazy had some plastic trays, and I had some tuk-n-ruffle (stop gagging! lol), so we created a pretty plate to put the diaper cake on:

We tried to be create with the items we had purchased. For instance....Cake crazy figured out how to fold and roll some socks into roses and green ribbon into leaves!

Here is the final cake that we came up with:

~Chelle
We didn't want to show up empty-handed, and wanted to get something for the mom-to-be.
We decided....since we are cake artists, why not a Diaper Cake!
We went out shopping to get the necessary supplies, then headed back to Cake Crazy's house to put it together.
We first had rolled all the diapers into cylinders, and held them together with hair elastics:

We then used a bottle as the center and 41 diapers surrounding it to make up the bottom layer. The middle layer consisted of 21 diapers and the top layer had 7 diapers around another bottle.
Cake Crazy had some plastic trays, and I had some tuk-n-ruffle (stop gagging! lol), so we created a pretty plate to put the diaper cake on:

We tried to be create with the items we had purchased. For instance....Cake crazy figured out how to fold and roll some socks into roses and green ribbon into leaves!

Here is the final cake that we came up with:

~Chelle
Baby Shower Corsages
A good friend (we'll call her CakeCrazy) and I have a friend that was throwing a baby shower for her daughter. We offered to help with whatever she needed, and I was asked to make some corsages for the mom-to-be and the grandmothers.
She didn't really have a preference of flowers, and since I had some leftover roses and hydrangeas, I asked if those would be fine. She said sure! She did say the color theme was purple - the mom-to-be doesn't like pink.
So, I went home, dug out the roses and hydrangeas and all of my purple dusting colors.

I know it looks like a lot, but after taking a wonderfully fabulous dusting class from Ruth Rickey I have learned the magic secret to getting lifelike colored flowers (hint: layering!) So, I started with pale blue hydrangeas (hey, it's what I had, lol!), and layered on each purple color, using the darkest on only the edges.
Here's the progression of colors at each stage:

I also used some of the paler shades and dusted the rose a pale lavendar. I had some purple toulle I found, as well as some purple gingham ribbon and a fabulous sparkly purple butterfly that CakeCrazy gave me to use! I put them all together and came up with this:

I was nice, but it still needed something. I send the picture to Cake Crazy and gave her a call to toss around some ideas. Her first suggestion was it needed green. She had also given me a baby items mold, and we thought that a few of those items would look cute sticking out the top of the corsage. So, I went ahead and followed her suggestions.
I had some leaves that were leftover, so I dusted them (yes, multiple shades of greens and other colors) and put them together with the flowers. I also made some baby booties and baby bottles and added those to the corsages:


Here's a close-up of the baby items and leaves:

Finally, here are all three together:

Our friend did not see them until they were all completed. She absolutely loved them!!! That's the best compliment a cake/sugar artist can ask for!
~Chelle
She didn't really have a preference of flowers, and since I had some leftover roses and hydrangeas, I asked if those would be fine. She said sure! She did say the color theme was purple - the mom-to-be doesn't like pink.
So, I went home, dug out the roses and hydrangeas and all of my purple dusting colors.

I know it looks like a lot, but after taking a wonderfully fabulous dusting class from Ruth Rickey I have learned the magic secret to getting lifelike colored flowers (hint: layering!) So, I started with pale blue hydrangeas (hey, it's what I had, lol!), and layered on each purple color, using the darkest on only the edges.
Here's the progression of colors at each stage:

I also used some of the paler shades and dusted the rose a pale lavendar. I had some purple toulle I found, as well as some purple gingham ribbon and a fabulous sparkly purple butterfly that CakeCrazy gave me to use! I put them all together and came up with this:

I was nice, but it still needed something. I send the picture to Cake Crazy and gave her a call to toss around some ideas. Her first suggestion was it needed green. She had also given me a baby items mold, and we thought that a few of those items would look cute sticking out the top of the corsage. So, I went ahead and followed her suggestions.
I had some leaves that were leftover, so I dusted them (yes, multiple shades of greens and other colors) and put them together with the flowers. I also made some baby booties and baby bottles and added those to the corsages:

Now they looked fabulous!!!!!!!!
Here's a close-up of the flowers:

Here's a close-up of the baby items and leaves:

Finally, here are all three together:

Our friend did not see them until they were all completed. She absolutely loved them!!! That's the best compliment a cake/sugar artist can ask for!
~Chelle
Armed Forces Day
Here is the post you've all been eagerly waiting for!!!! Pictures of the finished cake that I entered at the Great American Cake Show in Westminster Maryland back in the beginning of May.
The cake was not assembled prior to transporting it to Maryland. Not because I didn't think it would make it, but rather because I ran out of time, lol! Also because I suck at arranging flowers, and needed the advice of some good friends that were at the show with me.
So..........without further ado, here it is, in all it's glory!

I'm sure you're all asking yourselves one question...."Well....how did the cake do???" Fortunately for you, I'll tell you, lol!
The awards ceremony for the show is held on the last day of the show, at about 4pm. They go through all the divisional awards, and then they do the Wedding Cake Division. They only announce the top 10 wedding cakes (there were about 50-70 this year).
As they were going through the cakes (from 10 to 1), the closer they kept getting to 1, the less chance I figured that my cake was in the top 10. Definitely by the time they got to 6th place, I had pretty much convinced myself that I didn't get in the top 10 this year. I've always said I would be happy to be in the top 10, I seriously don't think I've ever win 1st place, the other competitors are just too good. Well...........they called 5th place and THEY CALLED MY NAME!!!!!!!!!!!!!!!! I was so stunned I actually screamed! Oh yes I did! My friends congratulated me and I was on cloud nine! I think I was still on it after I got home from the show, lol. My friend's took this picture shortly after they called my name:

So, needless to day, the show was a great success, lol!
~Chelle
The cake was not assembled prior to transporting it to Maryland. Not because I didn't think it would make it, but rather because I ran out of time, lol! Also because I suck at arranging flowers, and needed the advice of some good friends that were at the show with me.
So..........without further ado, here it is, in all it's glory!

I'm sure you're all asking yourselves one question...."Well....how did the cake do???" Fortunately for you, I'll tell you, lol!
The awards ceremony for the show is held on the last day of the show, at about 4pm. They go through all the divisional awards, and then they do the Wedding Cake Division. They only announce the top 10 wedding cakes (there were about 50-70 this year).
As they were going through the cakes (from 10 to 1), the closer they kept getting to 1, the less chance I figured that my cake was in the top 10. Definitely by the time they got to 6th place, I had pretty much convinced myself that I didn't get in the top 10 this year. I've always said I would be happy to be in the top 10, I seriously don't think I've ever win 1st place, the other competitors are just too good. Well...........they called 5th place and THEY CALLED MY NAME!!!!!!!!!!!!!!!! I was so stunned I actually screamed! Oh yes I did! My friends congratulated me and I was on cloud nine! I think I was still on it after I got home from the show, lol. My friend's took this picture shortly after they called my name:

So, needless to day, the show was a great success, lol!
~Chelle
I have not given up!! :)
Hello Everyone! I know....it's been a long time (a REALLY long time) since I posted, and I left you all hanging about the cake I was doing for Great American Cake Show in Westminster Maryland. What can I say......life happens, lol!
I am working to post the rest of the information about the cake, as well as cakes I've done since then.
Stay tuned!
~Chelle
I am working to post the rest of the information about the cake, as well as cakes I've done since then.
Stay tuned!
~Chelle
Tuesday, May 10, 2011
Separator Poles
I thought for quite a while on what to use to make the separator poles for the cake. I could have just stacked the tiers on top of each other, but I love tiered cakes, and needed a place for all my awesome flowers, lol. I had a lot of different ideas - some doable, some not. I finally settled on wooden dowels covered in the colors of each branch of the military. I was in Washington DC a few months ago, and found a display of military ties in a store, and took a picture of them.


I purchased 1/2 inch wooden dowels from the hardware store, and had them cut to length, and sharpened on the ends. I had to be able to push them into the dummy cakes, so they had to be sharp. I then wrapped black floral tape along the length of the dowel rods so that the fondant would stick to it better:

So, I colored the fondant the appropriate colors, and rolled out strips of fondant and attempted to wrap them around one of the dowel rods. Three tries later (and miraculously, no dowels were flung across the kitchen), it was evident that this was not going to work. So, rather than have crappy looking fondant separators, I chose to use satin ribbon to create the separators.
I laid the ribbon out on the table, taped the two main colors together on the back, then wrapped it around the dowel rod. I wrapped the dowel rod with double stick tape before I attempted to tape the ribbon on.

It went fairly smoothly doing it this way. Here are the finished separators:

The ends are taped so they wouldn't unravel, and so that they would fit smoothly into the dummy cakes.


I purchased 1/2 inch wooden dowels from the hardware store, and had them cut to length, and sharpened on the ends. I had to be able to push them into the dummy cakes, so they had to be sharp. I then wrapped black floral tape along the length of the dowel rods so that the fondant would stick to it better:

So, I colored the fondant the appropriate colors, and rolled out strips of fondant and attempted to wrap them around one of the dowel rods. Three tries later (and miraculously, no dowels were flung across the kitchen), it was evident that this was not going to work. So, rather than have crappy looking fondant separators, I chose to use satin ribbon to create the separators.
I laid the ribbon out on the table, taped the two main colors together on the back, then wrapped it around the dowel rod. I wrapped the dowel rod with double stick tape before I attempted to tape the ribbon on.

It went fairly smoothly doing it this way. Here are the finished separators:

The ends are taped so they wouldn't unravel, and so that they would fit smoothly into the dummy cakes.
Swags
The bottom tier of the cake featured swags of red, white and blue. I used my pasta roller, and rolled out the fondant and placed it on my work mat. I then used a ribbon cutter (from Geraldine Randlesome/Creative Cutters) to cut a ribbon the width that I wanted. I then cut the ribbon to length (a little longer than I needed for the side of the tier) and flipped it over. I folded one edge over (VERY lightly - you do NOT want a crease in the fondant) to produce a soft fold on one side. I then wet the spots on the cake where I was going to attach the ends of the swag and placed the swag on the tier. This is the same method that Geraldine teaches in her classes, btw.
I started with the red, and did red all the way around the tier. I left some space at each 'corner' between the swags. I don't really know why, I don't really know what I was thinking. One I had the red done, I proceeded with the white and blue ones. In addition to wetting the cake near the corners, I also wet the flat part of the previous swag, so it would be stuck on there pretty good. (I promise this will all make more sense when you see the pictures!). After attaching each swag to the tier, I trimmed the ends with my palette knife to make them look better, and smoothed the edges with my finger.
After I finished with the swags, I took a look at the cake:

I knew I had to do something to cover the corners, but didn't really have an idea. I had made yellow "Support Our Troops" ribbons, but they would not sufficiently cover the corners. I started to freak out, and called JEM for her opinion. We ended up coming up with the idea to put red 'ribbons' over the corners, so I went ahead and did that:

I then tried to put the yellow support ribbons on the corners, and they just didn't look right. After another consultation with JEM (What would I do without her?!?!?!?!?!), I cut out some stars, painted them gold with luster dust and vodka, and attached them to the corners:

I started with the red, and did red all the way around the tier. I left some space at each 'corner' between the swags. I don't really know why, I don't really know what I was thinking. One I had the red done, I proceeded with the white and blue ones. In addition to wetting the cake near the corners, I also wet the flat part of the previous swag, so it would be stuck on there pretty good. (I promise this will all make more sense when you see the pictures!). After attaching each swag to the tier, I trimmed the ends with my palette knife to make them look better, and smoothed the edges with my finger.
After I finished with the swags, I took a look at the cake:

I knew I had to do something to cover the corners, but didn't really have an idea. I had made yellow "Support Our Troops" ribbons, but they would not sufficiently cover the corners. I started to freak out, and called JEM for her opinion. We ended up coming up with the idea to put red 'ribbons' over the corners, so I went ahead and did that:

I then tried to put the yellow support ribbons on the corners, and they just didn't look right. After another consultation with JEM (What would I do without her?!?!?!?!?!), I cut out some stars, painted them gold with luster dust and vodka, and attached them to the corners:

Sunday, May 8, 2011
Fly like an Eagle..................
Another element to the cake were eagles. In my original plans, there was to be a gumpaste eagle on the top of the cake with wings outspread, and would have been overlooking the bridal couple (aim high, right?). Well, needless to say, time got to me, and it didn't get made. I had also planned to have eagles on the sides of the middle tier. I was torn between trying to pipe them and use chocolate molds. Well, after the success of piping the tiny eagles for the military logos, I figured I'd give it a shot hand-piping the bigger eagles.
I looked at the logo's that had eagles on them, and decided I liked the eagle on the US Marine's one the best. So, I blew up the image on my computer until it was the size that I wanted for the side of the cake. I then taped the images to a board and covered them with saran (like you would for run-sugar). I decided on which tips to use (I think 3 or 4, not sure), and piped the eagle over the image. They came out pretty good:


I looked at the logo's that had eagles on them, and decided I liked the eagle on the US Marine's one the best. So, I blew up the image on my computer until it was the size that I wanted for the side of the cake. I then taped the images to a board and covered them with saran (like you would for run-sugar). I decided on which tips to use (I think 3 or 4, not sure), and piped the eagle over the image. They came out pretty good:

This is the eagle, before he was painted and dusted.
I piped ten (10) of them, even though I only needed 5. I figured this way I would have my pick of the best ones. Once they were all dry, I painted them with a light brown color, then dry dusted them with Old Gold luster dust.
They came out fantastic!!!

I didn't paint them with luster dust/vodka mixture because I really don't like how it looks when it dries. It kind of dries splotchy to me. This produced a much better looking product, in my opinion!
~Chelle
Subscribe to:
Posts (Atom)