No, not real ones you'd find on an actual lamp. I'm talking cake-ish ones, lol. I am making a baby shower cake for this weekend (Sunday), and I am attempting to make the cake look like the lamp that the mom-to-be has picked out for the nursery.
Today I had planned to start and finish the lamp shade for the lamp. That didn't quite happen, but I did get a lot done today.
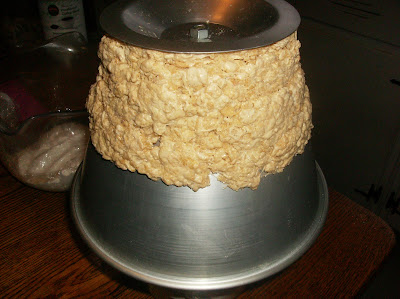
My initial thought for the lamp shade was the Wonder Mold pan. I decided that a dummy cake would be the best way to go with the lamp shade, plus there will be plenty of cake in the base of the lamp. I looked at the Wonder Mold Pan for a while trying to envision a lamp shade. I realized that if I screwed the stand onto the pan and turned it upside down, it kind of looked like a lamp shade, I just had to find a way to fill in the empty space. Using just icing seemed silly, and unnecessarily heavy. I came up with using Rice Krispie Treats to fill in the bulk of the empty space.
So, I started my day with making Rice Krispie Treats......without the butter so the RKT's would dry harder than normal RKT's do. Ever try to melt marshmallows in a big pan on the stove without butter??? Let's just say it's a good thing no one is eating these RKT's. First the marshmallows started toasting (which was actually kinda cool, lol), but then they started burning (not so cool!). So, I added a small pat of butter to the pan, and it helped a little. Finally got the marshmallows melted, and poured in the Rice Krispie's. Took it all off the stove and attempted to stir it together. I actually BROKE a wooden spoon!!! I was stirring and it just snapped in my hand! I was shocked and flabbergasted!! So, I ended up scraping the RKT's off the spoon with a knife, and used a metal pie server to stir. Turned them out onto a sheet of parchment paper and, using a second piece, flattened them out the best I could so they would cool.
Sorry, no pictures of the RKT saga.....things were just happening too fast for me to think of it!
Once the RKT's were coolish, I took the Wonder Mold Pan and started filling in the empty space (on the outside of the pan) with RKT's. Thankfully, they stuck to the pan, cause if not I didn't really have a solution, lol. I filled in most of the space and figured I could do the rest with Royal Icing.
So, I made two batches of Royal Icing to make sure I had enough. I used my icing spatula to apply the Royal Icing to the outside of the pan. Once applied, I used an 18" long, plastic ruler to smooth the icing, using the top and bottom of the pan as a guide. It worked fabulous!!! My Royal Icing started to dry and set up while I was trying to put finishing touches on, but it's ok. I was hoping I would not have to cover it with fondant, but I will have too, lol. I also filled in the top of the pan and tried to make it concave shaped. Not 100% sure how I'm going to apply the fondant, but we'll figure that out tomorrow.
While I was working on the lamp shade, I had the cake baking in the oven for tomorrow. I decided to make the base of the lamp out of 6" square cakes. Now....there's no way I was buying a 6" square pan (even IF you can find them), so I decided I could bake a half sheet (12x18) and get 6 cakes out of it. I thought of this a few days ago - good thing because I realized my Wilton Half Sheet pan would not do. Instead, I decided I needed a Magic Line half sheet pan. Magic Line's sides on their square/rectangle pans are straight, not angled like Wilton's are. I ended up using 4 cake mixes (doctored) in the Magic Line pan, rather than 3 like I used to use in the Wilton one. It ended up taking just over an hour to bake, at 325. I have noticed that it doesn't take all that much more time to bake at the lower temp (have even baked at 300 before), and you get a more consistently risen cake.
Once the cake came out of the oven, and had cooled off, I decided to go ahead and cut it into the sizes I needed. I cut the cake into 6 smaller cakes, leveled it and torted it. I had put the cake onto a large cutting board to do the cutting and leveling. So, rather than try to wrap 6 different cakes, I wrapped the entire cake on the cutting board, so it will stay fresh until tomorrow.
Here is a picture of the lamp that I am trying to re-create for the shower.
The base of the lamp has a wooden piece at the top and bottom that overhangs the base. I decided to use contact-paper covered foam boards for these boards. So, I purchased some wood grain contact paper, and foam board at the craft store. I cut the foam boards slightly larger than the cakes will be, and covered the top and bottom with contact paper.
You will notice that the boards have a hole cut into them. You might be wondering why.........for my support system! A very dear friend of mine had the most awesomest idea of how to support the lamp.....use Wilton's Tall Tier Stand!!! So, that's why there are holes cut into the boards, lol! I will have to cut holes in the cakes also. I was looking at the stand tonight (you can screw the spacers together without having to use the plates), and after trying the boards to make sure they fit, I realized it was not a good idea to stack the cake, and THEN try to put it on the spacers. Assembling the cake on the spacers is a much better idea! My plan is to use three 1" cake layers with two layer of filling between them, put bubble tea straws and cardboard for support, and then stack another set of cake and filling. I haven't decided how many to use yet, we'll see big the cake starts getting, lol. I am thinking I'll need three, the cake needs to feed 40ish people, and if I use three, then I can cut 16 slices from each "cake" and have enough cake for everyone.
I had been wondering how I was going to suspend the lamp shade without it wobbling around, and I think I have figured it out! I can put one of the smaller plates (that just fits inside the wonder mold pan) on one of the spacers, and it will stop the pan from wobbling. We'll see how this works tomorrow!
I wasn't in the mood to try to cover the lampshade with fondant tonight, so I decided to put it off until tomorrow. Instead, I made the frostings and filling for tomorrow. I made a batch of stiff icing to use for my icing dam. I made two batches of thin icing to use to frost the cake with. Hopefully I can get it smooth enough that I don't have to use fondant, but we'll see.
I then made the filling for the cake. Peanut butter buttercream with chopped up Reese's PB Cups and Hershey's chocolate bars. Yes, it does taste as heavenly as it sounds!!! I made three batches to ensure that I did not run out and have to make more, lol
Oh, and here are the cookies all bagged up, I did those before starting anything else this morning!
Subscribe to:
Post Comments (Atom)


The lampshade looks great!!! When you were explaining it to me I had no idea what you were talking about. I just couldn't visualize it. The cookies are so adorable. I really want one right now, Thanks!
ReplyDelete